Tuesday, November 20, 2012

Rose Cake - Vanilla with Vanilla Buttercream

I am very excited to write this blog post. Out of all the desserts I've made, this might be the one I'm the most proud of. Not only does this cake taste awesome, but I'm really happy with the way I decorated it - and that's a first!

I recently discovered Bakerita, and she makes me feel lame because she's two years younger than me and her stuff is GORGEOUS and perfect. I have no excuse. But looking at her Fluffy White Cake, I was inspired and decided to try it for myself.

I only used her recipe for the cake. For the icing, I used this recipe.

The cake recipe called for cake flour, but I only had flour. Luckily, I had cornstarch. So instead of two and a half cups of cake flour, I used two cups plus four tablespoons of regular flour, and four tablespoons of cornstarch.

I used my horribly tiny sifter that holds only three fourths of a cup, but since this cake was for one of my husband's coworkers, I wanted it to be perfect.

I split the batter into two pans and baked them. One took 25 minutes, the other took 27, so keep a close eye on them.

While they finished cooling, I prepared the icing. I couldn't believe the recipe called for an ENTIRE two-pound bag of powdered sugar. The recipe said that it was VERY sweet (well, duh) but that was good because the coworker who ordered the cake specifically said he wanted sweet icing. I added just a tiny bit of Wilton "Sky Blue" Icing Color to make it more "manly", since it was going to a man and it was going to be covered in roses (lol - he said he didn't mind me practicing on it, as long as it tasted good). Also, after reading some of the comments I noticed a few people complained about the taste as a result of the shortening used, so I followed their suggestions and added just a bit of almond extract.

I used this frosting to make a crumb coat on my first-ever two-layer cake (yay!).

Not finished yet...

Since it was just the crumb coat, it didn't have to be smooth, as long as the cake didn't show through. I put this in the fridge for about ten minutes to make the rest of the frosting easier.

I used this tutorial for my rose decorating, and I couldn't believe how easy it was!

Looks professional, doesn't it?

It looks AMAZING, right? And it was SO EASY. It would have turned out even better if I'd been using a creamier buttercream, but I wanted the roses to hold their shape overnight since it wouldn't be until the next day that the cake would be delivered.

I don't like to sound like I'm bragging but I'm very proud of this cake. I did not get to eat a slice of it but a small piece fell off the edge while I was frosting it and I tasted it and it was very good. The batter tasted great too, and it smelled exactly like a box mix while baking in the oven.

This one is a definite success! I was very happy that my first attempt at both a two-layer cake and this decorating technique turned out so well. 

Divinity Fudge/Candy/Whatever You Want to Call It

I think I mentioned this in a previous post, but both of my parents AND one of my brothers have birthdays in November. This means a lot of baking. My mom got those lovely cheesecake stuffed strawberries - actually, that was my parents' joint birthday party, but when I found this recipe for divinity fudge, I had to try it since divinity fudge is my dad's favorite candy ever.

Oh, and I'm not sure what you want to call it - divinity fudge, divinity candy, or just divinity - I've heard it called all three and there were never any outraged retorts. So if I go back and forth between what I call it throughout this post, it's because of the ambiguity behind the name.

So first of all, I figured I might have problems with this recipe, since the only two things the blogger says you MUST have for this recipe to work are a dry day and a good candy thermometer, and I lack the latter. I used a meat thermometer, but it topped out at 165 degrees, and the temperature called for when making the syrup is 252 degrees. The needle on my thermometer kept moving upwards but the notations stopped at 165, so I had to eyeball it. I suspect I removed it from the heat before it was ready.

I also lack a stand mixer, so when the recipe told me to beat the mixture for ten minutes, I thought I would die. I was especially thinking this when, ten minutes later, my mixture had not lost its gloss and was not holding in stiff peaks. I mixed for another five or ten minutes (it seemed like forever) and finally I figured if it was going to work, it would have by now, so I went ahead and threw in the vanilla extract and chopped walnuts.

My batch only yielded seventeen divinities, which is probably better anyway since my dad is the one who'd be eating most of them and he's not a huge sweets fan. After letting them set in the fridge overnight, they had firmed up nicely on the outside, but the inside was still very gooey.


I topped each one with a walnut half.

I wrote them off as a mixed success/failure, given that they tasted great but their consistency left something to be desired...but the next day they had firmed up all the way through, making them perfect. My dad liked them and that's what mattered the most, anyway.

German Chocolate Cake and Cupcakes

If you've been following my blog, you'll notice that many of the cakes I make are for my husband's boss at work. He has a major sweet tooth and I sort of set up a deal with him in which I make him cakes and he gives me honest feedback. An inadvertent bonus to this deal is that all of my husband's coworkers get to see and admire my cakes, so I'm slowly but steadily building a reputation.

Anyway, my point is that today's dessert - German Chocolate Cake - is another one of those that went to him. The recipe is for a two-layer cake, but I wasn't ready to do that yet, so I made him a single-layer cake and made a batch of cupcakes for my family to eat.

This is a pretty labor-intensive recipe to follow, though not difficult. I didn't have many problems at all (and anyone who knows me knows that to be a feat). One problem I did have was with the filling. My son was running amok in the kitchen so I wasn't able to stir constantly for the first minute, thus resulting in a few "scrambled egg" bits floating around. I picked them out with a spoon, so it wasn't a problem really, just inconvenient.

I also omitted the rum in the syrup. I wasn't too sure about using just sugar water, but it worked and tasted fine. I don't like having alcohol in our house so when I make this recipe again for my brother-in-law's birthday in December, I'll more than likely omit it then as well, since it's not missed.

German chocolate cake isn't the most beautiful, but it sure is tasty.
 
The chocolate icing was DELICIOUS. I had a really hard time not licking the bowl. You can see my decorating skills haven't come very far, although I liked the little stars in the center. I'm still working on steadying my hand for piped edges.
 

The more icing, the better!

And these were the cupcakes made with the second half of the batter. Since I'd made one one-layer cake and one batch of cupcakes, the cooking time needed to be adjusted and I forgot to account for that, so they were SLIGHTLY dryer than I'd have preferred...but this didn't seem to bother my family, who raved about them. My mom took some to her coworkers and my brother's friends had some as well, and everyone said how awesome they were. I already mentioned how my brother-in-law wants one for his birthday now, too, after only seeing my cake - and my mom wants me to make one for Christmas as well. What have I gotten myself into?

Friday, November 9, 2012

Cheesecake-Stuffed, Chocolate-Dipped Strawberries

Do you know what the number one repinned recipe on Pinterest is? Before I tell you the answer, let me make one thing clear. Do NOT discount the opinions of 700,000 Pinners (plus one more - me!). If that number tells you anything, it should be that THESE ARE GOOD.

The recipe in question is Cheesecake-Stuffed Strawberries from The Sweets Life. I added the chocolate-dipped part myself. I mean, chocolate can ONLY make things better. Except for onions. I imagine chocolate-dipped onions are pretty atrocious.

In the prelude before the recipe, she states that she made hers twenty-four hours ahead and they turned out fine. Since I was making mine for a joint party for my parents (both their birthdays are in November) and I was going to be busy before the party, I decided to do so as well.

I only used three tablespoons of powdered sugar, since I was planning on dipping the berries in chocolate and I didn't want them to be too sweet. Without the chocolate, I'd probably add more, but the way I made them turned out perfect.

I used Dolci Frutta melting chocolate to dip my berries in.


They were a hit at the party. Only two were left afterwards, and this morning when I looked in the fridge they were gone. My dad's already asked me to make a bigger batch of them for his work function next week.

My only complaint is the berries were not as firm as they were when I prepared them the night before. I suppose this is to be expected. I don't think I'll make them twenty-four hours ahead next time - maybe just a few hours ahead, so that they'll maintain their firmness better.

This recipe gets an absolute, hands-down A+++ in my book!

White Chocolate Skulls with Walnut Brains

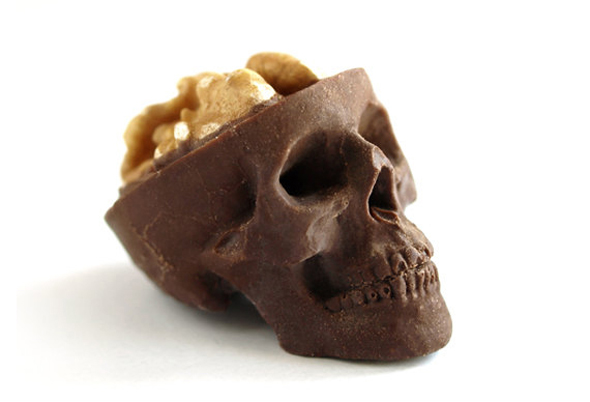
So during the week before Halloween, I thought it would be fun to recreate something I'd seen on Pinterest. I didn't see a recipe for it, so unfortunately no link for that, but the construction was simple enough. Here's the picture that inspired me...


Chocolate skulls with walnut brains! Spooky.

I decided mine would be white chocolate, and I'd use pink-tinted white chocolate to glaze over the walnuts to look like a brain. The silicone mold I used was bought at Wal-Mart for ninety-nine cents and was supposed to be an ice cube tray, but I figured it would work the same.

If you've been following my blog, you may remember that I used to have trouble melting chocolate. I can now melt it perfectly fine, however I cannot temper it. I read somewhere that tempering could be achieved by melting a bit of the chocolate and then adding small chunks one at a time until it was all melted. I tried this, and it didn't work. The chocolate turned out tasty enough, but it had teeny-tiny crystalline particles which, while not altogether unpleasant, aren't what you expect when biting into a piece of chocolate; additionally, it melted VERY quickly and did not have that beautiful shiny exterior that chocolate is supposed to have.


Oh, and did I mention the trouble I had getting my skulls out of their mold? After pouring the liquid chocolate into the mold, I sat it in the fridge for five minutes and then brought it back out and let it set on the counter overnight. I had read somewhere (and I sure wish I could find the website I used for this information) that any longer could cause the sugar in the chocolate to adhere to the mold and make it stick. Well, the next morning I found that my chocolates had STILL not set. I finally got agitated and figured "to hell with it" and put them in the freezer. This solved the problem - they fell right out of the mold (with a little bending and twisting).

I sliced off the tops of their skulls right above their eyes and placed a small dab of pink-tinted white chocolate to serve as glue for the walnuts. Originally I'd thought walnut halves were what I needed, but as small as the chocolates turned out to be I only used a fourth on each skull. After letting that set for a moment, I used a small paintbrush to glaze over my brains.

See the rough surface? Boo.

In retrospect, I should have added more red food coloring to the chocolate. It looked pink enough in the pan and I didn't want it to look red which is why I stopped when I did. Hindsight's 20/20, though.

In conclusion, this is a VERY cool project that had lots of potential, though due to misinformation and lack of tempering knowledge it could have turned out better. I think I'll use a better mold next time, as well. Preferably one that's more three-dimensional.