Saturday, July 6, 2013

Fourth of July Flag Sugar Cookies

We go to the same Fourth of July party every year, and every year I try to make something different. Last year I took key lime pie bars. This year, I made sugar cookies decorated like a flag. These were inspired by the lovely Sugarbelle.

I made two batches which yielded almost 150 cookies. I used the same recipe for sugar cookies as I always do - only because it's the best sugar cookie recipe ever. It's soft, not too sweet, and pairs perfectly with the sweet royal icing (to which that link above also leads). Days after being made these cookies are still delicious.


With the first few cookies that went into the oven, they weren't flattening out enough to be frosted, so we turned them into some impromptu chocolate macarons.


I made several batches of the icing, and after many hours of standing I finally finished. In the morning, after the icing had set, I arranged them to look like a flag.


The red could have been a little darker but overall, I think they turned out really cute! They were pretty tedious, though. That's why I rarely make sugar cookies, and that's why it will be a HELL of a long time before I do a job making 150 again. That's an absurd amount of sugar cookies!

Monday, July 1, 2013

Father's Day - Lemon Bars/Key Lime Pie Bars

I never know what to make for Father's Day because neither my dad nor my husband have much of a sweet tooth. I know, I know - they're inhuman. So for this year's dessert, I decided to go with a recipe I've been eyeballing for a long time. Just as I was about to make it, my mom asked me to make a certain recipe in addition. So I ended up making two different kinds of bars.

The first was something I'd made before - key lime pie bars. (Here's the link to when I made them the first time.) The crust on these bars is to die for - and I suppose you could take that literally, since they're probably unhealthy as hell.


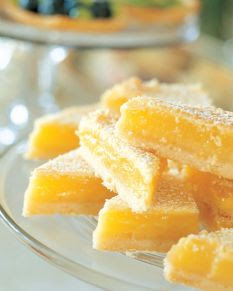
In addition, I made something I'd never made before, but had been wanting to for a long time - Ina Garten's lemon bars. These turned out absolutely delicious! The bottom layer was almost like a sugar cookie. They were sweet but very tangy as well, which is just the way I like my lemon confections. Oftentimes lemon-flavored stuff is way too sweet and it's just too overbearing for my palate. These, however, were absolutely perfect.


Just for the record (and so I don't get sued or something), neither of those pictures are mine. I forgot to take pictures, unfortunately. :(

These citrus bars are a great combo for any get-together. They are both delicious, tangy, and light enough to eat after a big meal. Everyone at our party was raving about them!


KEY LIME PIE BARS
(Adapted from My Baking Addiction)
Yield:  16 bars

CRUST:
  • 1 1/2 cups crushed graham crackers (about 2/3 of a sleeve)
  • 2 tablespoons sugar
  • 1/3 cup butter, melted
  • 1/2 cup sweetened flaked coconut
FILLING:
  • 3 cups sweetened condensed milk
  • 1/2 cup sour cream
  • 3/4 cup key lime juice (I used Nelly and Joes Key Lime Juice)
  • 1 tablespoon grated lime zest
DIRECTIONS:
CRUST: 
  1. In a small bowl, combine the crumbs, coconut and sugar; add butter and blend well. Press onto the bottom of a nine inch springform pan.
  2. Bake at 350 degrees for 8 minutes; cool on wire rack.
FILLING:
  1. Preheat oven to 350 degrees F (175 degrees C).
  2. In a medium bowl, combine condensed milk, sour cream, lime juice, and lime rind. Mix well and pour into graham cracker crust.
  3. Bake in preheated oven for 5 to 8 minutes, until tiny pinhole bubbles burst on the surface of pie. DO NOT BROWN! Chill pie thoroughly before serving. Cut into 16 bars; garnish with powdered sugar.


LEMON BARS
(Adapted from Barefoot Contessa)
Yield:  20 bars

CRUST:
  • 1/2 pound unsalted butter at room temperature
  • 1/2 cup granulated sugar
  • 2 cups all-purpose flour
  • 1/8 teaspoon salt
FILLING:
  • 6 extra-large eggs at room temperature
  • 3 cups granulated sugar
  • 2 tablespoons grated lemon zest (4 to 6 lemons)
  • 1 cup freshly squeezed lemon juice
  • 1 cup all-purpose flour
  • Powdered sugar, for dusting
DIRECTIONS:
  1. Preheat the oven to 350 degrees.
  2. For the crust, cream the butter and sugar until light in the bowl of an electric mixer fitted with the paddle attachment. Combine the flour and salt and, with the mixer on low, add to the butter until just mixed. Dump the dough onto a well-floured board and gather into a ball. Flatten the dough with floured hands and press it into a 9 x 13 x 2-inch baking sheet, building up a 1/2-inch edge on all sides. Chill.
  3. Bake the crust for 15 to 20 minutes, until very lightly browned. Let cool on a wire rack. Leave the oven on.
  4. For the filling, whisk together the eggs, sugar, lemon zest, lemon juice, and flour. Pour over the crust and bake for 30 to 35 minutes, until the filling is set. Let cool to room temperature.
  5. Cut into squares and dust with powdered sugar.

Thursday, May 23, 2013

Chocolate Truffle Tart

I seem to be posting less and less these days - but PLEASE bear with me. I am breastfeeding my nearly-three-month-old daughter and chasing around my two-year-old son and when I'm not doing either of those things I'm popping Tylenols and wishing I was in Maui.

I can no longer blame my cravings on being pregnant, but dammit, I wanted something chocolate. This brings us to today's recipe, the rich and decadent Chocolate Truffle Tart. The only thing I did differently from the recipe was I used a store-bought chocolate crust. So sue me. I used Ghirardelli bittersweet chocolate chips, made with 60 percent cacao.

It took exactly twenty minutes to bake.


It turned out perfect! Dusted with cocoa powder, it looks lovely, in addition to tasting absolutely divine. The texture of this tart is silky smooth, like a real truffle, and the taste...oh, the taste. I absolutely recommend this recipe to ANYONE who loves chocolate. You won't regret it one bit! Unless you're on a diet, and even then you may not mind.

There's something else I wanted to write about today. When I first started this blog, I knew I wanted to be an inspiration to others who, like me, were afraid to try new things for fear of failing. I have gotten to the point where most of what I bake turns out well, but not always! This truffle tart is not the only thing I've baked this month. I also made a coconut crème pie from a recipe found on the back of a box of nonfat dry milk. Let's just say it was a failure. I have no idea what went wrong, but when I sliced into it, it had not set and was WAY too liquidy to eat. It still tasted divine, but the texture was horrible. I did not take a picture, unfortunately. I guess I forgot because I was so pre-occupied with being disappointed and trying to figure out where I messed up.

My point is, even though my coconut crème pie was a disaster, I'm not letting that deter me from pursuing my dreams of a career in baking. In the beginning, such an event would have depressed me and given me second thoughts about baking. It feels good to know that even though I'm still VERY capable of making mistakes, my confidence has grown strong enough to withstand those mistakes.

Moral of the story:  If at first you don't succeed, try - try again!

Tuesday, April 30, 2013

Classic Cheesecake

I can't believe it's already near the end of April, and this is only my second post this month. Having two babies really caught me off-guard, I guess (ha-ha). Hopefully by now I've gotten into the swing of things and will be able to get back to posting regularly.

A while ago a friend of my husband's asked me to bake him a cheesecake. After making his, I realized that I kind of wanted a cheesecake for myself. So I decided to look up a great recipe for just the basic, original cheesecake. I found one of Martha Stewart's that sounded good, so I went with it.

The first thing I did was, in compliance with the recipe, make the crust. I actually ended up making two crusts, because with my first I followed Martha's suggestions. It ended up being WAY too thin and crumbled from being overbaked. So when it came to Round 2, I doubled the crust recipe. This seemed to work well.

I ran out of eggs so my cheesecake had only three eggs and one egg white (made with Just Whites). I also didn't have lemon zest, so I used half a teaspoon of lemon extract instead. Finally, my cheesecake baked an hour and forty-seven minutes, two minutes longer than Martha advised. It didn't look done enough in the center, but near the edges was getting a little too brown for my comfort.


Of course, I wish it would have been perfectly white all across the top, but it turned out rather pretty. (Though my husband said it looked like a wheel of cheese.)


It tasted amazing. The texture was just a tiny bit less smooth than I'd have liked, but I suspect I might have overmixed the batter. Overall, this is a great recipe for cheesecake that I imagine can be altered fairly simply. I highly recommend this one to everyone.

Monday, April 8, 2013

Cheesecake-Filled Chocolate Eggs

Wow, it's been over a week since Easter, yet here I am just now getting to my Easter post. Shame on me!

I found these beautiful cheesecake-filled chocolate eggs a while ago, and couldn't wait to make them. I was going to make my own homemade chocolate eggs using some of the suggestions given in the recipe, but found the plastic eggs I had bought had holes (for drainage, I imagine) in each end, so I just went ahead and bought some online from See's. Each box contained six so I bought two boxes, to give me twelve.

 All I did was trim the tops of each egg and dispose of them and the white chocolate chicks from inside each egg. I tell you, this extra chocolate disposal process was a painful one, indeed.

After that was simple. I just mixed together the ingredients for the cheesecake filling, used a sandwich baggie with the corner snipped to fill in each egg, and sat them in the fridge.

Once it was time to add the "yolks", I decided to stray from the recipe and use something even better than fruit sauce. What goes better with chocolate and cheesecake than caramel?? I used Smucker's ice cream topping (the kind in the jar). It worked perfectly.


This was a great recipe and everyone was really impressed with it. The only thing I was unhappy about was that the pretty little egg cup I bought specifically to use when photographing these eggs was too big, so I couldn't use it. But hey, I'll take that kind of regret over my food being nasty/ugly any day.

Sunday, March 17, 2013

St. Patrick's Day Cupcakes

It has been a while since I posted, and the reason for that is a good one - my baby girl was born! At seven pounds and one ounce, and nineteen and a half inches long, she is absolutely beautiful.


Isn't she gorgeous? So, forgive me if I took a bit of time to get back into the blogosphere. But here I am, with something cool - and easy! - for St. Patrick's Day.


I saw these on Pinterest first, and I thought they were adorable. I've been waiting for an opportunity to make them. 

I used store-bought cake mix and frosting - when I'm stopping to feed a baby every forty-five minutes, it's just easier to do it that way. So cut me some slack. The rainbows were made with Airheads Xtremes, and the "pot of gold" was a Rolo.

These are super easy, but everyone will be impressed all the same. This is a cute recipe that's sure to be a hit.

Tuesday, March 5, 2013

Burger Cupcakes

I am really excited about this post, so I'm going to skip the banter usually found in these introductions and get straight to it. I have seen these adorable burger cupcakes all over the internet, a million different times - and every time I see it I pester my husband for his opinion of how cute they are ("Aren't these amazing? Aren't they cool? I so need to make these. How cute are they, on a scale of one to ten?" My husband puts up with so much.)

So finally, I've found (or perhaps invented) an excuse to make my very own version of these awesome cupcakes. I used store-bought frosting, but I made my cupcakes from scratch. Oh, and instead of using brownies for the burger patties as in the original, I used chocolate cupcakes. I love brownies as much as the next person - probably more, if I'm being completely honest with myself - but I thought cake-on-cake would probably taste better and have a better consistency. Plus, I'm not a huge fan of brownies with frosting.

The recipe I used for my yellow cupcakes came from Mel's Kitchen Cafe, and the one for my chocolate cupcakes came from Taste of Home. The latter recipe was meant for making a cake but I changed the baking time to adapt to my cupcakes.

My yield ended up being 39, with about five or so others that were destroyed in the experimentation process. See, my cupcakes didn't turn out nice and even on top like in the pictures. My first ones had giant "muffin tops", and my second batch (which I made smaller after seeing how the first ones came out) had their middles rise but the edges were flat. So I had to mess around with a few before finding the right way to assemble them.

Then came the frosting. I used Wilton food colors - Leaf Green, Buttercup Yellow, and Red-Red. For the final touch, I lightly brushed the top of each "burger" and sprinkled on some gold sugar crystals for the sesame seeds.


Aren't they cool?! Not as perfect as Bakerella's of course, but I'm super happy with them.


Both cake mixes turned out well enough. The yellow cake tasted like a sweet cornbread, I thought, which was fine since there was going to be quite a bit of frosting. The chocolate cake could have been better in my opinion but seeing as it made up only a tiny part of the burger, it hardly mattered. However, if I were going to make a chocolate cake from scratch, I'd definitely opt for a different recipe.

These were a hit and tasted great, so I definitely recommend you give them a try sometime! They're a little labor-intensive, but worth it when everyone tells you again and again how cool they are.