Showing posts with label Cake. Show all posts

Sunday, March 17, 2013

St. Patrick's Day Cupcakes

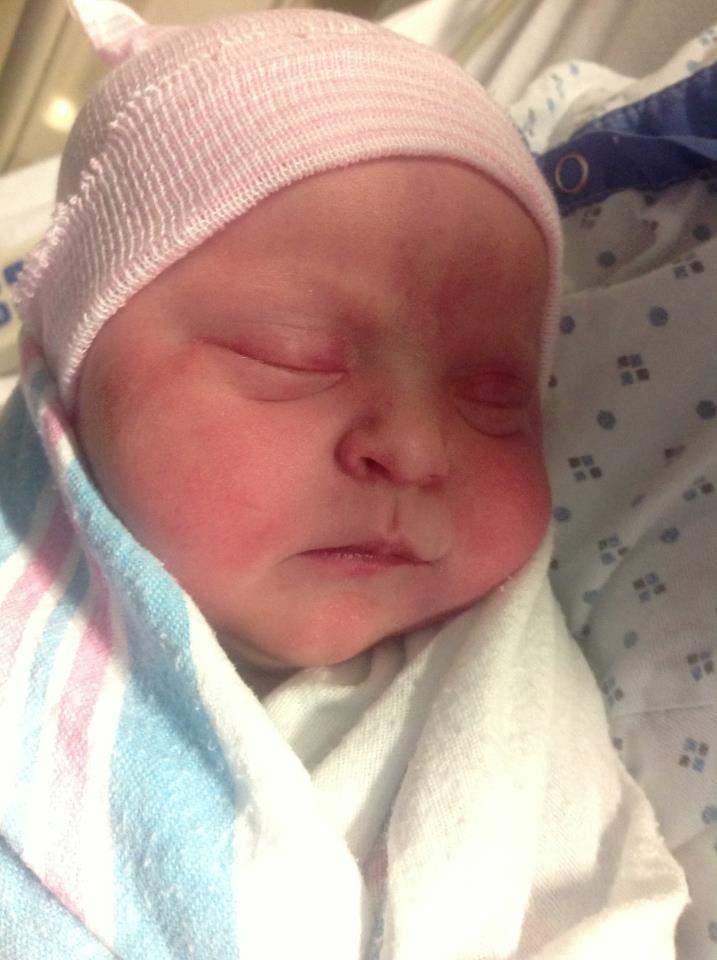
It has been a while since I posted, and the reason for that is a good one - my baby girl was born! At seven pounds and one ounce, and nineteen and a half inches long, she is absolutely beautiful.


Isn't she gorgeous? So, forgive me if I took a bit of time to get back into the blogosphere. But here I am, with something cool - and easy! - for St. Patrick's Day.


I saw these on Pinterest first, and I thought they were adorable. I've been waiting for an opportunity to make them. 

I used store-bought cake mix and frosting - when I'm stopping to feed a baby every forty-five minutes, it's just easier to do it that way. So cut me some slack. The rainbows were made with Airheads Xtremes, and the "pot of gold" was a Rolo.

These are super easy, but everyone will be impressed all the same. This is a cute recipe that's sure to be a hit.

Tuesday, March 5, 2013

Burger Cupcakes

I am really excited about this post, so I'm going to skip the banter usually found in these introductions and get straight to it. I have seen these adorable burger cupcakes all over the internet, a million different times - and every time I see it I pester my husband for his opinion of how cute they are ("Aren't these amazing? Aren't they cool? I so need to make these. How cute are they, on a scale of one to ten?" My husband puts up with so much.)

So finally, I've found (or perhaps invented) an excuse to make my very own version of these awesome cupcakes. I used store-bought frosting, but I made my cupcakes from scratch. Oh, and instead of using brownies for the burger patties as in the original, I used chocolate cupcakes. I love brownies as much as the next person - probably more, if I'm being completely honest with myself - but I thought cake-on-cake would probably taste better and have a better consistency. Plus, I'm not a huge fan of brownies with frosting.

The recipe I used for my yellow cupcakes came from Mel's Kitchen Cafe, and the one for my chocolate cupcakes came from Taste of Home. The latter recipe was meant for making a cake but I changed the baking time to adapt to my cupcakes.

My yield ended up being 39, with about five or so others that were destroyed in the experimentation process. See, my cupcakes didn't turn out nice and even on top like in the pictures. My first ones had giant "muffin tops", and my second batch (which I made smaller after seeing how the first ones came out) had their middles rise but the edges were flat. So I had to mess around with a few before finding the right way to assemble them.

Then came the frosting. I used Wilton food colors - Leaf Green, Buttercup Yellow, and Red-Red. For the final touch, I lightly brushed the top of each "burger" and sprinkled on some gold sugar crystals for the sesame seeds.


Aren't they cool?! Not as perfect as Bakerella's of course, but I'm super happy with them.


Both cake mixes turned out well enough. The yellow cake tasted like a sweet cornbread, I thought, which was fine since there was going to be quite a bit of frosting. The chocolate cake could have been better in my opinion but seeing as it made up only a tiny part of the burger, it hardly mattered. However, if I were going to make a chocolate cake from scratch, I'd definitely opt for a different recipe.

These were a hit and tasted great, so I definitely recommend you give them a try sometime! They're a little labor-intensive, but worth it when everyone tells you again and again how cool they are.

Wednesday, February 13, 2013

Valentine's Day Cake Pops and Strawberries

I'm not Valentine's Day's biggest fan, but I do have to say I love the goodies that come along with it! It's just about the only time of year I like the color pink, too. I'm not very girly at all - I don't think I even own a pink shirt - but when this time of year comes around, who can resist making everything in pretty shades of pink and red?

Maybe it's just the mass amounts of chocolate consumed that make me feel this way, but enough rambling. Let's get this post started. This is one of two Valentine's Day posts I'm going to be posting. This half of the festivity was made for a Valentine's Day party at my father's work. He requested cake pops and chocolate-covered strawberries.


Both of these pictures were taken from a phone, so sorry if they're not top notch. As you can see, half of the cake pops were white and half were pink. Instead of using melted white chocolate this time, I gave vanilla-flavored almond bark a try. I much preferred it to chocolate. The taste is equally delicious and it's thinner (thus, not as heavy), so it was easier to apply. To decorate I used edible pearls and alternate-colored drizzles.

I used a cake mix to make these, so sue me. You may notice that when it comes to things I intend to spend a significant amount of time on decorating, I opt for mixes. Maybe that's lazy, but I'm sorry if I don't want to spend hours upon hours standing in my kitchen while my one-year-old roams the house screaming. I'm 37 weeks pregnant, also - so cut me some slack.


And here are my berries. Again, I used melted almond bark and melted milk chocolate to dip these, with alternate-colored drizzles. I think the white ones with the pink drizzles look pretty cool.

Everyone loved them, my dad said. Who doesn't love fruit dipped in chocolate and bits of cake on a stick?

Yes, so speaking of me being pregnant - about that. Like I said, I'm 37 weeks along so any time now my little girl will be making her arrival into this world. I'll keep baking and blogging until she gets here, but once she's here, it may be a short while before I can establish a new routine and get back in the groove enough to start blogging again! I'm not talking months and months, just a few weeks maybe. I'm giving you fair warning so you don't get tired of waiting and give up on me.

Anyway, so keep an eye out for Valentine's Day post number two, which I'll have up sometime within the next two days. Until next time!

Saturday, January 26, 2013

Rose Cake - Strawberry with Vanilla Buttercream

January 24 is my husband's birthday, and his favorite kind of cake is strawberry. So this year I made him a strawberry cake, per his request, and he graciously allowed me to adorn it with roses for practice.

The recipe I used was recommended to me from one of my mother's coworkers - it comes from Paula Deen. I can't decide whether I can truly call it homemade, since instead of adding flour or sugar it calls for a box mix, but the confusion ends there. It's an easy recipe and the addition of gelatin mix makes for an interesting, almost carbonated-tasting kick. The use of frozen strawberries in syrup makes the cake very moist.

The only variation I made in the recipe was the baking time. My cake didn't look done after only twenty minutes, so I left it in a bit longer. It ended up taking twenty-eight minutes total.

For the frosting, I used this recipe. It worked well for me last time so why fix what isn't broken? I ended up running out before my cake was done being decorated, though, so I had to make another half batch. I used butter instead of shortening for this because I had run out of shortening. The color was slightly yellower but my family couldn't tell until I pointed it out.


This is the first layer cake (or rose cake, for that matter) I've made that I actually got to taste, so here's my opinion of the frosting. While it holds its shape perfectly for a rose cake, the roses cause the frosting to be so thick that it's almost too sweet. With this particular cake recipe, the slight tang of the gelatin mix mingled nicely with the sweetness, but with other recipes the sweetness might have been overwhelming. I think next time I'll use less sugar. With a whole two-pound bag of sugar in it, I suppose it's a "DUH" that the frosting would be that sweet, but oh well.

The final verdict:  With this cake, this frosting would be perfect in lesser amounts. With other cakes, I can't say since I haven't tasted it myself, but I imagine that it would be too sweet if paired with a cake recipe that was also super-sweet. Altogether, my cake went over well and I am happy with it. Still a long way to go on my decorating, but I'm getting better!

Thursday, January 3, 2013

Cake Pops - Birthday

Last time I made cake pops, it was such a fiasco that I pushed all thoughts of cake pops from my mind. Every time I saw pictures of them, no matter how adorable, I resisted the urge to make them myself. However, my brother's birthday is today, and a while ago he informed me that cake pops were what he wanted me to make. I started to refuse, but then figured it had been a while and I've learned a few things since then, so may as well give it another try.

As with last time, I used a boxed cake mix to make my pops. The cake mix called for a cup of water, but my cake pop pan instructions said that for best results, I should substitute milk for water and cut the amount in half. So instead of one cup of water, I used one half-cup of milk. This made my batter thicker and I suspect that's where my problem came from.

Despite coating the pan generously with cooking spray, most of my cake balls broke in half as I opened the pan. I managed to salvage the equivalent of fifteen cake pops.

In order to be able to use the halves, I put melted white chocolate in between them, like a sandwich. There were a few that hadn't broken so I just put them on the sticks, using the melted chocolate as a glue. Then I let them all sit in the refrigerator for a while to set before I decorated them.


That is a Wilton cake pop decorating stand - much better than what I used last time, which was a styrofoam block that tipped over because my pops were too heavy.


This photo is just a close-up so you can see how I glued my cake pop halves together with chocolate.

After they set in the fridge, I started to decorate. I used green and blue food coloring and sprinkles. The finished product, though simple, looked very nice.


Some of the pops that had been glued together with chocolate were too heavy, so they began to come off their sticks when dipped in chocolate. To remedy this, I enlisted the help of my step-daughter. I held the pop together between its stick and a toothpick while she added the sprinkles.

This batch of cake pops, while simpler in design than my last batch, I found to be much more visually appealing - and a lot more fun to make. I think this is because last time I made them I had no idea what I was getting into. The internet made cake pops look so easy and adorable - I didn't know much about what I was doing, what supplies were needed, etc. There are a hundred different problems you can run into making cake pops, and though I've barely scratched the surface of the art of cake-pop making, I feel a lot more prepared. I know now that cake pops aren't as easy as they look and, what's more, I've learned to not let myself lose track of the fun that baking is supposed to be by comparing what I make with the masterpieces produced by others. There will ALWAYS be someone better than me, and that's ok! As long as I love what I'm doing, I will keep doing it.

Friday, December 28, 2012

Chocolate Sour Cream Bundt Cake

For Christmas, I had been planning on making German chocolate cake again, but after making it three times I was a little burnt out on that recipe so I decided to go with something else chocolatey. After a little bit of browsing, I found the perfect thing:  chocolate sour cream Bundt cake, adapted from a Williams-Sonoma recipe.

As always I made a few changes. I used self-rising flour, which didn't seem to make a difference. Also I thought we had more sour cream than we did, so I only used one cup, which is half a cup short of what is called for in the recipe.

Other than that, I followed the recipe closely. I pulled my cake out a few minutes earlier than it suggested because it was done already. (I suspect my oven has a higher temperature than it indicates, but I have yet to test this.)

I actually made this cake on Christmas Eve Eve, and made the ganache on Christmas Eve. It still turned out perfect.


Beautiful, isn't it? And it was delicious. My mom said it "cut like a steak". It was very rich, so some people topped it with whipped cream, but it was great alone, too. A small slice was enough sweetness for the day, that's how rich it was, but don't take that as a  bad thing!

The ganache was great because it was firm enough to keep its lovely drippiness overnight, but it was soft when you bit through it.

I highly recommend this recipe to everyone. Don't let the "sour cream" part disturb you - I hate sour cream and was a little put off by its inclusion in this cake, but you can't taste it at all. In fact, I'm not sure what exactly it does for the recipe, but it was delicious, so I'm not complaining.

Tuesday, November 20, 2012

Rose Cake - Vanilla with Vanilla Buttercream

I am very excited to write this blog post. Out of all the desserts I've made, this might be the one I'm the most proud of. Not only does this cake taste awesome, but I'm really happy with the way I decorated it - and that's a first!

I recently discovered Bakerita, and she makes me feel lame because she's two years younger than me and her stuff is GORGEOUS and perfect. I have no excuse. But looking at her Fluffy White Cake, I was inspired and decided to try it for myself.

I only used her recipe for the cake. For the icing, I used this recipe.

The cake recipe called for cake flour, but I only had flour. Luckily, I had cornstarch. So instead of two and a half cups of cake flour, I used two cups plus four tablespoons of regular flour, and four tablespoons of cornstarch.

I used my horribly tiny sifter that holds only three fourths of a cup, but since this cake was for one of my husband's coworkers, I wanted it to be perfect.

I split the batter into two pans and baked them. One took 25 minutes, the other took 27, so keep a close eye on them.

While they finished cooling, I prepared the icing. I couldn't believe the recipe called for an ENTIRE two-pound bag of powdered sugar. The recipe said that it was VERY sweet (well, duh) but that was good because the coworker who ordered the cake specifically said he wanted sweet icing. I added just a tiny bit of Wilton "Sky Blue" Icing Color to make it more "manly", since it was going to a man and it was going to be covered in roses (lol - he said he didn't mind me practicing on it, as long as it tasted good). Also, after reading some of the comments I noticed a few people complained about the taste as a result of the shortening used, so I followed their suggestions and added just a bit of almond extract.

I used this frosting to make a crumb coat on my first-ever two-layer cake (yay!).

Not finished yet...

Since it was just the crumb coat, it didn't have to be smooth, as long as the cake didn't show through. I put this in the fridge for about ten minutes to make the rest of the frosting easier.

I used this tutorial for my rose decorating, and I couldn't believe how easy it was!

Looks professional, doesn't it?

It looks AMAZING, right? And it was SO EASY. It would have turned out even better if I'd been using a creamier buttercream, but I wanted the roses to hold their shape overnight since it wouldn't be until the next day that the cake would be delivered.

I don't like to sound like I'm bragging but I'm very proud of this cake. I did not get to eat a slice of it but a small piece fell off the edge while I was frosting it and I tasted it and it was very good. The batter tasted great too, and it smelled exactly like a box mix while baking in the oven.

This one is a definite success! I was very happy that my first attempt at both a two-layer cake and this decorating technique turned out so well. 

German Chocolate Cake and Cupcakes

If you've been following my blog, you'll notice that many of the cakes I make are for my husband's boss at work. He has a major sweet tooth and I sort of set up a deal with him in which I make him cakes and he gives me honest feedback. An inadvertent bonus to this deal is that all of my husband's coworkers get to see and admire my cakes, so I'm slowly but steadily building a reputation.

Anyway, my point is that today's dessert - German Chocolate Cake - is another one of those that went to him. The recipe is for a two-layer cake, but I wasn't ready to do that yet, so I made him a single-layer cake and made a batch of cupcakes for my family to eat.

This is a pretty labor-intensive recipe to follow, though not difficult. I didn't have many problems at all (and anyone who knows me knows that to be a feat). One problem I did have was with the filling. My son was running amok in the kitchen so I wasn't able to stir constantly for the first minute, thus resulting in a few "scrambled egg" bits floating around. I picked them out with a spoon, so it wasn't a problem really, just inconvenient.

I also omitted the rum in the syrup. I wasn't too sure about using just sugar water, but it worked and tasted fine. I don't like having alcohol in our house so when I make this recipe again for my brother-in-law's birthday in December, I'll more than likely omit it then as well, since it's not missed.

German chocolate cake isn't the most beautiful, but it sure is tasty.
 
The chocolate icing was DELICIOUS. I had a really hard time not licking the bowl. You can see my decorating skills haven't come very far, although I liked the little stars in the center. I'm still working on steadying my hand for piped edges.
 

The more icing, the better!

And these were the cupcakes made with the second half of the batter. Since I'd made one one-layer cake and one batch of cupcakes, the cooking time needed to be adjusted and I forgot to account for that, so they were SLIGHTLY dryer than I'd have preferred...but this didn't seem to bother my family, who raved about them. My mom took some to her coworkers and my brother's friends had some as well, and everyone said how awesome they were. I already mentioned how my brother-in-law wants one for his birthday now, too, after only seeing my cake - and my mom wants me to make one for Christmas as well. What have I gotten myself into?

Saturday, October 6, 2012

Vanilla Cake with Vanilla Frosting

My son recently turned one, so for his birthday I decided to go with an UglyDolls theme. Their website is here, if you haven't heard of them - they're super cute and I've been a fan for forever it seems like. I got one of the stuffed animals when I was in high school and when he was born, he seemed to take a liking to it. I knew before he was even born that I wanted to do a monster theme for his first birthday party (yes, I'm one of those moms who plans everything out years in advance...) but until about two weeks before the party, I didn't know I was going to focus specifically on UglyDolls.

Anyway, my point is, I baked his cake from scratch and arranged the creature called "Big Toe" in fondant on top of it. This is Big Toe -

 I assume he is called Big Toe on the basis of his shape?
 
 
- and this is my cake.

Not quite as spectacular as I had envisioned, but oh well - it was for a one-year-old.
 
I used this recipe from Sweetapolita for Fluffy Vanilla Cake with Vanilla Bean Frosting. As always, I made a few variations, although I didn't make as many this time.
 
It is supposed to yield an eight-inch two-layer cake, and I made it instead as a 9"x13" sheet cake. The second variation I made was one of convenience - the recipe for both the cake and the icing calls for sifted flour and confectioner's sugar. However, the only sifter I have barely holds a cup, so it's ridiculously time-consuming to sift so much flour. I'm hoping someone will gift me with a decent-sized sifter this Christmas - hint hint.
 
So in lieu of sifting, I whisked the dry ingredients for a good while, hoping it might help my cause. I knew this would affect the fluffiness of the cake, and I was right. The cake was denser than most cake but not in an unappealing way.
 
In my opinion, the icing was a bit too buttery tasting. I followed that recipe exactly, substituting vanilla extract for the vanilla bean as the recipe advises. It just tasted too buttery to me.
 
Here is a close-up of the fondant Big Toe (that sounds kind of gross).
 
Cute, right?

I used Wilton fondant, color mist, and icing colors to create this little guy. He was thicker than I'd planned but it was my first attempt at fondant and I was feeling kind of stressed about the party being in an hour. The color mist, though convenient, had a rather unsavory taste that I wasn't too keen about. But it served its purpose of turning the fondant blue. For the nose, I rubbed on some red icing color. I did the same with the black bits.

I made a separate cupcake for my son to eat/destroy, so here's a picture of that.

His cupcake, on his cool robot plate.
 
We put a few blue sprinkles on it for decoration and then plopped a big "1" candle in it.
 
The cake went over well, only one piece was left over and it was devoured shortly thereafter. It seemed to be a hit, but next time I'll hopefully have a nice sifter, so it will be even better.


Wednesday, September 5, 2012

Golden Butter Cupcakes with Almond Flowers

This is another one of those posts that I will use to focus on my decorating, rather than my baking. Using a picture I clipped out of a magazine a while back, I made a batch of cupcakes and decorated half to look like flowers, using sliced almonds. These were made for a Labor Day party.

I used a box mix for these cupcakes - Betty Crocker's Super Moist Golden Butter Cake Mix. I made 24 cupcakes using the box's directions, but I ended up only decorating 13 for the party. Once they had cooled, I began decorating.

For the plain ones, I used Duncan Hines' Frosting Creations. If you haven't seen these, they are very cool. They offer all types of flavors - bubblegum, cherry vanilla, mint chocolate, orange creme, and several others. I used chocolate almond. Thus, I had seven chocolate almond frosted cupcakes. Still six to go.

For these six, I frosted them with Duncan Hines' Cream Cheese frosting. Then I took two bags of sliced almonds and, by sticking them into the frosting in concentric circles, created flowers.

Aren't they pretty?
 
 
You may notice that, in the very middle, I have placed almonds with the skin still intact on one side. This creates a distinct center that helps the illusion of a flower. 

The whole batch.
 
 
These went over well, though I think some people were afraid to bite into the ones with almonds. They do look rather spiky! ;) They are more for accent than anything, really. I was happy with the way these turned out. 

Chocolate Cake with Buttercream Frosting

It seems like there is always something going on with our family.

Once again, I have fallen behind on my posts due to circumstances outside the blogosphere. Illnesses in the family have slowed down my baking so luckily there's only two posts I need to catch up on. Hopefully I'll be getting back in the groove soon.

Today's post comes to us from My Baking Addiction (if you couldn't tell, I've fallen in love with her).  The recipe is aptly named The Best Chocolate Cake. I'd have to agree.

I did not use black cocoa flour, and instead of buttermilk I used regular milk. I made this cake on a whim - my mom's whim, actually. She was craving something chocolate so that's how this all began. Anyway, those are the only variations from the recipe. Now, I am not a coffee fan, but the coffee complemented this rich cake wonderfully - not too overwhelming.

I used one 13x9 pan in which to bake my cake, and it turned out beautifully. Now, if you look at the bottom of the recipe, you'll see her recommendation for icing - chocolate buttercream frosting. I followed this suggestion.

Again, I substituted milk for the cream in this recipe. Also, the first time through I did not see where she plainly stated that melted butter would NOT work in this recipe - it must be softened, not melted. I think this is where I went wrong.

My frosting turned out delicious, but runny. After it set it was better but still not the thick, luscious icing you see depicted on the recipe page.

It sort of pooled around the sides.
 
 
This cake paired with this icing was very rich, but not too sweet due to the addition of coffee. I really wish I had noticed the caveat about the butter, because then it would have been perfect. But oh well.
 
Delish.


Wednesday, July 25, 2012

Tie-Dye Cupcakes

My key lime pie bars might have been the prettiest thing I've made so far, but the subject of this post is definitely the coolest. Betty Crocker's tie-dye cupcakes weren't hard to make, but they did take a little time. Now this recipe is member-exclusive, so if you haven't already signed up for BC's email list, you can do so here.

I followed the recipe's suggestions for colors:  red, orange, yellow, green, blue, and purple. Each color was in a separate bowl, so as you can see, this is a recipe with some clean-up involved, as well. Totally worth it though!

So awesome.

They came out of the pan looking awesome already. As you can see, I used white baking cups so the colors could be viewed through the side.

The hardest part was the frosting, and even that wasn't necessarily difficult - just time-consuming. I realized too late that I was out of gallon baggies so for a moment I thought I'd have to frost them the plain, boring way - but then I remembered that my awesome cousin just gave me a bunch of Wilton cake decorating stuff. I took a disposable icing bag and a few icing tips. The recipe calls for a #6, but I used a #14 since I didn't have a #6. As it happened, the #14 was way too small - it took me forever to ice each cupcake, so when it came time to refill the bag, I switched to a #36. Much better.


Definitely the coolest thing I've made so far.

Perfect!

I forgot to mention that I made these for my husband's work meeting. One of his bosses said these cupcakes were the coolest thing he'd ever seen. Everyone who had one had great things to say. And at the end of the meeting, there were none left! Good thing I had taken a few aside for my family the night before.

DC Cake Pops

So today's post is the saga of my DC cake pops. DC, in case you aren't aware, is the comics company that does Batman. I used Betty Crocker's Extra Moist White cake mix. So, like a few of my other posts, this is more about decoration. I coated them with white chocolate mixed with food coloring and decorated them with Betty Crocker's Decorating Cookie Icing.

Cooling, while stuck into styrofoam blocks.

I only have 18 cake pop sticks, and I ended up making about 30. My husband and I improvised and came up with a solution for the other 12 - we'd put them on straws. BAD idea. The cake pops were much too heavy for the straws but I had no other option. We reinforced them by folding straw pieces in half and putting them inside the straws, and that helped - but they were still very top-heavy.

The next problem I encountered was the cake balls were too heavy to be dipped into the white chocolate. They came off the ends of the sticks, even though I had "glued" them together with melted chocolate and let them cool. So I ended up having to "paint" each cake pop, resulting in a totally NOT smooth surface, as I had envisioned.

Again, this is white chocolate, even though it looks like icing. Ugh.

I suppose I am something of a perfectionist, not because everything I do is perfect - definitely not that - but because when I imagine something, and then it turns out differently, I become very agitated. When the chocolate coating on my cake pops did not turn out smooth, I just about gave up on the whole thing. Childish, yes.

But I did end up finishing what I'd started. I used toothpicks to apply the icing and in the end, things turned out alright.

Starting in upper left and going clockwise:  Flash, Superman, Green Lantern, Batman.

Batman was my favorite, and Green Lantern turned out horribly, but I was so frustrated by the end of this project that I didn't even care enough to fix it.

Overall, I'm happy with them. This was my first attempt at cake pops and I ran into several obstacles, but next time, I'll know how to handle them. Although, it'll probably be quite a while before I try these again - the process was quite frustrating and kind of burnt me out on them.

Tuesday, July 24, 2012

Carrot Cake Cupcakes

This post features what I made for Father's Day - carrot cake cupcakes. They weren't from scratch, though. They were made from a Duncan Hines mix. This post is more to highlight my decorating skills, or lack thereof.

My carrots look more like peppers.


The mix was alright, I thought - not the best I'd ever had. I'm not a fan of raisins, for one thing. However, I did enjoy the real bits of carrot in it.

Now, my icing job. I'm happy with it, I suppose, but it's clear to me that I need practice. I used Betty Crocker's Easy Flow icing in orange and green. You almost have to be a body-builder in order to get the icing to come out. It requires a lot of pressure pushing down on the nozzle for the icing to flow. I think that was a large part of my problem, but I know I can't blame it all on that. 

Lemon Cake

It's been a while since I've had time to post anything new - my son recently learned to crawl and I've been chasing him constantly. But he's asleep now (THANK GOD) so I'm going to try to catch up tonight.

I've baked quite a few things since I last wrote. We'll start with the oldest, and go from there.

This first post is going to be Lemon Cake. I made it in two loaf pans, so we kept one and sent the other to his boss. The blog from which I pulled this recipe from is one I discovered recently and promptly fell in love with. Go pay her a visit at the Smitten Kitchen. The recipe is adapted from one by Ina Garten, whom I had never heard of before this instance, but I can say with assurance that woman definitely knows what's up. I am not generally a fan of lemon anything, but this cake was AWESOME.

The recipe gives the options of baking two loaves or one bundt, and as I mentioned previously, I chose the former. The plan was to decorate my husband's boss's cake with sliced lemons, to make it pretty. Except I forgot to do that. Next time...

I squeezed all my lemon juice myself and grated the peels with a horrible grater that I have. I made a mental note to buy a new one, but I forgot and was reminded when I made key lime pie bars for a Fourth of July party - that recipe will be up soon. :)

I did not have parchment paper, so I merely sprayed the bottom of the loaf pan generously with PAM. I should also mention that I do not have two loaf pans, so I split the batter in two and used the same pan twice.

Sifting together the dry ingredients took time, but it was definitely worth it. The cake turned out very light and fluffy.

Now, after the cake comes out, the recipe instructs you to wait ten minutes before pouring on the lemon syrup. However, I had the foresight to read the blog's comments, and several of them suggested pouring it on immediately, which I did. It soaked up the syrup very nicely and left no soggy areas. After letting it cool, I then poured on the glaze.

So lovely.


The glaze was an excellent complement to the cake. The cake was sweet, while the glaze brought in the tart lemony flavor often left desired in citrus desserts. And as I said earlier, the cake itself was light, so you could eat more than one piece and not feel like a fat pile of lard. I mean, if you wanted to. I wouldn't know anything about that. ;)


Smitten kitchen, indeed.