Wednesday, July 25, 2012

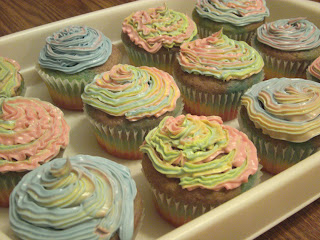
Tie-Dye Cupcakes

My key lime pie bars might have been the prettiest thing I've made so far, but the subject of this post is definitely the coolest. Betty Crocker's tie-dye cupcakes weren't hard to make, but they did take a little time. Now this recipe is member-exclusive, so if you haven't already signed up for BC's email list, you can do so here.

I followed the recipe's suggestions for colors:  red, orange, yellow, green, blue, and purple. Each color was in a separate bowl, so as you can see, this is a recipe with some clean-up involved, as well. Totally worth it though!

So awesome.

They came out of the pan looking awesome already. As you can see, I used white baking cups so the colors could be viewed through the side.

The hardest part was the frosting, and even that wasn't necessarily difficult - just time-consuming. I realized too late that I was out of gallon baggies so for a moment I thought I'd have to frost them the plain, boring way - but then I remembered that my awesome cousin just gave me a bunch of Wilton cake decorating stuff. I took a disposable icing bag and a few icing tips. The recipe calls for a #6, but I used a #14 since I didn't have a #6. As it happened, the #14 was way too small - it took me forever to ice each cupcake, so when it came time to refill the bag, I switched to a #36. Much better.


Definitely the coolest thing I've made so far.

Perfect!

I forgot to mention that I made these for my husband's work meeting. One of his bosses said these cupcakes were the coolest thing he'd ever seen. Everyone who had one had great things to say. And at the end of the meeting, there were none left! Good thing I had taken a few aside for my family the night before.

DC Cake Pops

So today's post is the saga of my DC cake pops. DC, in case you aren't aware, is the comics company that does Batman. I used Betty Crocker's Extra Moist White cake mix. So, like a few of my other posts, this is more about decoration. I coated them with white chocolate mixed with food coloring and decorated them with Betty Crocker's Decorating Cookie Icing.

Cooling, while stuck into styrofoam blocks.

I only have 18 cake pop sticks, and I ended up making about 30. My husband and I improvised and came up with a solution for the other 12 - we'd put them on straws. BAD idea. The cake pops were much too heavy for the straws but I had no other option. We reinforced them by folding straw pieces in half and putting them inside the straws, and that helped - but they were still very top-heavy.

The next problem I encountered was the cake balls were too heavy to be dipped into the white chocolate. They came off the ends of the sticks, even though I had "glued" them together with melted chocolate and let them cool. So I ended up having to "paint" each cake pop, resulting in a totally NOT smooth surface, as I had envisioned.

Again, this is white chocolate, even though it looks like icing. Ugh.

I suppose I am something of a perfectionist, not because everything I do is perfect - definitely not that - but because when I imagine something, and then it turns out differently, I become very agitated. When the chocolate coating on my cake pops did not turn out smooth, I just about gave up on the whole thing. Childish, yes.

But I did end up finishing what I'd started. I used toothpicks to apply the icing and in the end, things turned out alright.

Starting in upper left and going clockwise:  Flash, Superman, Green Lantern, Batman.

Batman was my favorite, and Green Lantern turned out horribly, but I was so frustrated by the end of this project that I didn't even care enough to fix it.

Overall, I'm happy with them. This was my first attempt at cake pops and I ran into several obstacles, but next time, I'll know how to handle them. Although, it'll probably be quite a while before I try these again - the process was quite frustrating and kind of burnt me out on them.

Tuesday, July 24, 2012

Key Lime Pie Bars

The last few posts have been horribly out of order chronologically, but this marks the point at which things start running the right way along the timeline again. Sorry for any confusion!

So this post's recipe, Key Lime Pie Bars, was made for a Fourth of July party, that was in fact held on the third. The recipe comes from a blog called My Baking Addiction, another blog I recently discovered and fell in love with.

Let me begin by telling you this recipe turned out BEAUTIFULLY. My favorite part of it was the crust, which was awesomely simple but some of the best I've ever had. Only four ingredients in the crust:  graham crackers, sugar, butter, and - surprise - coconut. I usually hate coconut, but this crust made me realize I'd better rethink that.

Now, the recipe calls for key lime juice, three fourths of a cup. It recommends using pre-squeezed juice, but I couldn't find any, so I bought a bag of key limes instead. I asked my mother how many I would need. She said probably three or four. So when I bought the bag of key limes, and it contained about twenty, I thought, "Damn - what the hell am I going to do with all these limes?!" Ha.

It took every last lime to reach that three-fourths line on my measuring cup. I had also used a few of them for the key lime zest, and this is when I realized that I had forgotten to buy a new grater since I loathe the one we have.

The recipe says the bars should be in the oven only 5 to 8 minutes, but mine were in there quite a bit longer and turned out fine. I was waiting for the pinhole bubbles and it took much longer than 8  minutes for them to appear.

The key lime zest did not throw off the smoothness of the bars at all, as I suspected it might. The tart key lime bar perfectly balanced out the sweet graham cracker and coconut crust. Instead of garnishing mine with coconut, I topped some with strawberry halves, others with blueberries, and each one got a dollop of Cool Whip.

I made a pretty little sign for the party.

I can't stop drooling over that crust.


Festive, aren't they? They were a hit. :)

Easter Basket Cookies

Anti-chronologically, we have gone from Father's Day to Mother's Day, and now to Easter. I had no idea I was so out of order. Wow.

This recipe is one of Betty Crocker's. It's simple, but the finished product is awesome - and everyone who saw them complimented them.

The first problem I ran into while preparing these cookies was after they came out of the oven. I must not have let them cool long enough - either that, or I didn't spray enough PAM into the pan. Either way, the bottoms became separated from the top. Some, we were able to "glue" together with icing. Others I was forced to abandon and eat myself - it's a painful job, but somebody had to do it. ;)

The orange one here is one of the ones we were able to save.


I pretty much followed the rest of the recipe exactly, except for one bit - instead of using small ribbons for the basket handles, I used pieces of Twizzlers that I had untwined. I filled each basket with a bit of dyed-green coconut for the "grass", then gave each a few mini chocolate Cadbury eggs. The result was adorable.

Aren't they cute?

A single cookie, for your viewing pleasure.

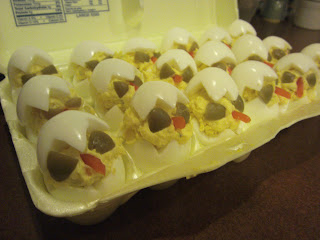
I couldn't conclude this post without mention of my other Easter creation. They are devilled eggs, made to look like chicks. I did not follow any recipe for these, but I did get the idea from a Google search. I don't remember the website to give credit, though I do know they were featured on Rachael Ray's show. 


Mini Cheesecakes Topped with Fruit

Since the last couple of posts and the next few are me playing catch-up, I'm kind of falling out of chronological order. Example:  Last post was what I made for Father's Day, and this post is going to be about what I made for Mother's Day. I know, I fail.

For Mother's Day, I made mini-cheesecakes with chocolate crust, topped with fruit. I had a lot of batter left over, though, so I also made a regular cheesecake. That one had a pre-made graham cracker crust and was glazed with chocolate, then topped with fruit. The recipe I used for the cheesecake is the one on the side of Philadelphia cream cheese, which I can't find the recipe for online to provide a link, but if I do in the future, I'll definitely post it.

My last experience with cheesecake bore the same results as this one. My cheesecake cracked on top. I know that means it's been overcooked. I'll just have to stare through the oven window the last few minutes, I suppose.

That damn crack.


My mini cheesecakes also cracked. UGH. At least the crack in the big one could be hidden by chocolate.


My awesome mini cheesecake pan.

A close-up of the crackage.

After cooling, I glazed the large cheesecake with Duncan Hines' Amazing Glaze. If you click on the link and look at the picture, I can promise you that is NOT what it looked like. It did not flow out; it did not harden into a lovely, smooth surface. No, it had to be smoothed manually with a spatula. But that could have been forgiven, if the glaze tasted amazing. It didn't. It tasted more like sugar than chocolate. I regretted using it. My last visit to the grocery store, while perusing the baking supplies aisle, I saw that Kroger had it on clearance. No wonder.

Again, I apologize for the unsightly yellow hue. I have no idea why my camera does that.

Still, the large cheesecake ended up looking nice.

My mini cheesecakes turned out perfect - other than the cracked tops, of course. They did not taste overcooked at all, let me assure you. Their chocolate crust was a nice accompaniment to the tart fruit they were topped with.

The ones in the back topped with just chocolate were for my grandmother, who's allergic to anything with seeds.


This recipe is definitely a make-again. If you are unable to find the Philadelphia recipe for original cheesecake, any similar recipe will do.

Carrot Cake Cupcakes

This post features what I made for Father's Day - carrot cake cupcakes. They weren't from scratch, though. They were made from a Duncan Hines mix. This post is more to highlight my decorating skills, or lack thereof.

My carrots look more like peppers.


The mix was alright, I thought - not the best I'd ever had. I'm not a fan of raisins, for one thing. However, I did enjoy the real bits of carrot in it.

Now, my icing job. I'm happy with it, I suppose, but it's clear to me that I need practice. I used Betty Crocker's Easy Flow icing in orange and green. You almost have to be a body-builder in order to get the icing to come out. It requires a lot of pressure pushing down on the nozzle for the icing to flow. I think that was a large part of my problem, but I know I can't blame it all on that. 

Lemon Cake

It's been a while since I've had time to post anything new - my son recently learned to crawl and I've been chasing him constantly. But he's asleep now (THANK GOD) so I'm going to try to catch up tonight.

I've baked quite a few things since I last wrote. We'll start with the oldest, and go from there.

This first post is going to be Lemon Cake. I made it in two loaf pans, so we kept one and sent the other to his boss. The blog from which I pulled this recipe from is one I discovered recently and promptly fell in love with. Go pay her a visit at the Smitten Kitchen. The recipe is adapted from one by Ina Garten, whom I had never heard of before this instance, but I can say with assurance that woman definitely knows what's up. I am not generally a fan of lemon anything, but this cake was AWESOME.

The recipe gives the options of baking two loaves or one bundt, and as I mentioned previously, I chose the former. The plan was to decorate my husband's boss's cake with sliced lemons, to make it pretty. Except I forgot to do that. Next time...

I squeezed all my lemon juice myself and grated the peels with a horrible grater that I have. I made a mental note to buy a new one, but I forgot and was reminded when I made key lime pie bars for a Fourth of July party - that recipe will be up soon. :)

I did not have parchment paper, so I merely sprayed the bottom of the loaf pan generously with PAM. I should also mention that I do not have two loaf pans, so I split the batter in two and used the same pan twice.

Sifting together the dry ingredients took time, but it was definitely worth it. The cake turned out very light and fluffy.

Now, after the cake comes out, the recipe instructs you to wait ten minutes before pouring on the lemon syrup. However, I had the foresight to read the blog's comments, and several of them suggested pouring it on immediately, which I did. It soaked up the syrup very nicely and left no soggy areas. After letting it cool, I then poured on the glaze.

So lovely.


The glaze was an excellent complement to the cake. The cake was sweet, while the glaze brought in the tart lemony flavor often left desired in citrus desserts. And as I said earlier, the cake itself was light, so you could eat more than one piece and not feel like a fat pile of lard. I mean, if you wanted to. I wouldn't know anything about that. ;)


Smitten kitchen, indeed.