Saturday, July 6, 2013

Fourth of July Flag Sugar Cookies

We go to the same Fourth of July party every year, and every year I try to make something different. Last year I took key lime pie bars. This year, I made sugar cookies decorated like a flag. These were inspired by the lovely Sugarbelle.

I made two batches which yielded almost 150 cookies. I used the same recipe for sugar cookies as I always do - only because it's the best sugar cookie recipe ever. It's soft, not too sweet, and pairs perfectly with the sweet royal icing (to which that link above also leads). Days after being made these cookies are still delicious.


With the first few cookies that went into the oven, they weren't flattening out enough to be frosted, so we turned them into some impromptu chocolate macarons.


I made several batches of the icing, and after many hours of standing I finally finished. In the morning, after the icing had set, I arranged them to look like a flag.


The red could have been a little darker but overall, I think they turned out really cute! They were pretty tedious, though. That's why I rarely make sugar cookies, and that's why it will be a HELL of a long time before I do a job making 150 again. That's an absurd amount of sugar cookies!

Monday, July 1, 2013

Father's Day - Lemon Bars/Key Lime Pie Bars

I never know what to make for Father's Day because neither my dad nor my husband have much of a sweet tooth. I know, I know - they're inhuman. So for this year's dessert, I decided to go with a recipe I've been eyeballing for a long time. Just as I was about to make it, my mom asked me to make a certain recipe in addition. So I ended up making two different kinds of bars.

The first was something I'd made before - key lime pie bars. (Here's the link to when I made them the first time.) The crust on these bars is to die for - and I suppose you could take that literally, since they're probably unhealthy as hell.


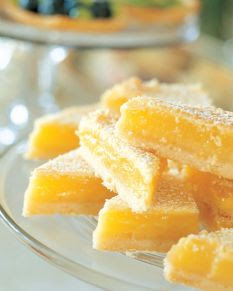
In addition, I made something I'd never made before, but had been wanting to for a long time - Ina Garten's lemon bars. These turned out absolutely delicious! The bottom layer was almost like a sugar cookie. They were sweet but very tangy as well, which is just the way I like my lemon confections. Oftentimes lemon-flavored stuff is way too sweet and it's just too overbearing for my palate. These, however, were absolutely perfect.


Just for the record (and so I don't get sued or something), neither of those pictures are mine. I forgot to take pictures, unfortunately. :(

These citrus bars are a great combo for any get-together. They are both delicious, tangy, and light enough to eat after a big meal. Everyone at our party was raving about them!


KEY LIME PIE BARS
(Adapted from My Baking Addiction)
Yield:  16 bars

CRUST:
  • 1 1/2 cups crushed graham crackers (about 2/3 of a sleeve)
  • 2 tablespoons sugar
  • 1/3 cup butter, melted
  • 1/2 cup sweetened flaked coconut
FILLING:
  • 3 cups sweetened condensed milk
  • 1/2 cup sour cream
  • 3/4 cup key lime juice (I used Nelly and Joes Key Lime Juice)
  • 1 tablespoon grated lime zest
DIRECTIONS:
CRUST: 
  1. In a small bowl, combine the crumbs, coconut and sugar; add butter and blend well. Press onto the bottom of a nine inch springform pan.
  2. Bake at 350 degrees for 8 minutes; cool on wire rack.
FILLING:
  1. Preheat oven to 350 degrees F (175 degrees C).
  2. In a medium bowl, combine condensed milk, sour cream, lime juice, and lime rind. Mix well and pour into graham cracker crust.
  3. Bake in preheated oven for 5 to 8 minutes, until tiny pinhole bubbles burst on the surface of pie. DO NOT BROWN! Chill pie thoroughly before serving. Cut into 16 bars; garnish with powdered sugar.


LEMON BARS
(Adapted from Barefoot Contessa)
Yield:  20 bars

CRUST:
  • 1/2 pound unsalted butter at room temperature
  • 1/2 cup granulated sugar
  • 2 cups all-purpose flour
  • 1/8 teaspoon salt
FILLING:
  • 6 extra-large eggs at room temperature
  • 3 cups granulated sugar
  • 2 tablespoons grated lemon zest (4 to 6 lemons)
  • 1 cup freshly squeezed lemon juice
  • 1 cup all-purpose flour
  • Powdered sugar, for dusting
DIRECTIONS:
  1. Preheat the oven to 350 degrees.
  2. For the crust, cream the butter and sugar until light in the bowl of an electric mixer fitted with the paddle attachment. Combine the flour and salt and, with the mixer on low, add to the butter until just mixed. Dump the dough onto a well-floured board and gather into a ball. Flatten the dough with floured hands and press it into a 9 x 13 x 2-inch baking sheet, building up a 1/2-inch edge on all sides. Chill.
  3. Bake the crust for 15 to 20 minutes, until very lightly browned. Let cool on a wire rack. Leave the oven on.
  4. For the filling, whisk together the eggs, sugar, lemon zest, lemon juice, and flour. Pour over the crust and bake for 30 to 35 minutes, until the filling is set. Let cool to room temperature.
  5. Cut into squares and dust with powdered sugar.

Thursday, May 23, 2013

Chocolate Truffle Tart

I seem to be posting less and less these days - but PLEASE bear with me. I am breastfeeding my nearly-three-month-old daughter and chasing around my two-year-old son and when I'm not doing either of those things I'm popping Tylenols and wishing I was in Maui.

I can no longer blame my cravings on being pregnant, but dammit, I wanted something chocolate. This brings us to today's recipe, the rich and decadent Chocolate Truffle Tart. The only thing I did differently from the recipe was I used a store-bought chocolate crust. So sue me. I used Ghirardelli bittersweet chocolate chips, made with 60 percent cacao.

It took exactly twenty minutes to bake.


It turned out perfect! Dusted with cocoa powder, it looks lovely, in addition to tasting absolutely divine. The texture of this tart is silky smooth, like a real truffle, and the taste...oh, the taste. I absolutely recommend this recipe to ANYONE who loves chocolate. You won't regret it one bit! Unless you're on a diet, and even then you may not mind.

There's something else I wanted to write about today. When I first started this blog, I knew I wanted to be an inspiration to others who, like me, were afraid to try new things for fear of failing. I have gotten to the point where most of what I bake turns out well, but not always! This truffle tart is not the only thing I've baked this month. I also made a coconut crème pie from a recipe found on the back of a box of nonfat dry milk. Let's just say it was a failure. I have no idea what went wrong, but when I sliced into it, it had not set and was WAY too liquidy to eat. It still tasted divine, but the texture was horrible. I did not take a picture, unfortunately. I guess I forgot because I was so pre-occupied with being disappointed and trying to figure out where I messed up.

My point is, even though my coconut crème pie was a disaster, I'm not letting that deter me from pursuing my dreams of a career in baking. In the beginning, such an event would have depressed me and given me second thoughts about baking. It feels good to know that even though I'm still VERY capable of making mistakes, my confidence has grown strong enough to withstand those mistakes.

Moral of the story:  If at first you don't succeed, try - try again!

Tuesday, April 30, 2013

Classic Cheesecake

I can't believe it's already near the end of April, and this is only my second post this month. Having two babies really caught me off-guard, I guess (ha-ha). Hopefully by now I've gotten into the swing of things and will be able to get back to posting regularly.

A while ago a friend of my husband's asked me to bake him a cheesecake. After making his, I realized that I kind of wanted a cheesecake for myself. So I decided to look up a great recipe for just the basic, original cheesecake. I found one of Martha Stewart's that sounded good, so I went with it.

The first thing I did was, in compliance with the recipe, make the crust. I actually ended up making two crusts, because with my first I followed Martha's suggestions. It ended up being WAY too thin and crumbled from being overbaked. So when it came to Round 2, I doubled the crust recipe. This seemed to work well.

I ran out of eggs so my cheesecake had only three eggs and one egg white (made with Just Whites). I also didn't have lemon zest, so I used half a teaspoon of lemon extract instead. Finally, my cheesecake baked an hour and forty-seven minutes, two minutes longer than Martha advised. It didn't look done enough in the center, but near the edges was getting a little too brown for my comfort.


Of course, I wish it would have been perfectly white all across the top, but it turned out rather pretty. (Though my husband said it looked like a wheel of cheese.)


It tasted amazing. The texture was just a tiny bit less smooth than I'd have liked, but I suspect I might have overmixed the batter. Overall, this is a great recipe for cheesecake that I imagine can be altered fairly simply. I highly recommend this one to everyone.

Monday, April 8, 2013

Cheesecake-Filled Chocolate Eggs

Wow, it's been over a week since Easter, yet here I am just now getting to my Easter post. Shame on me!

I found these beautiful cheesecake-filled chocolate eggs a while ago, and couldn't wait to make them. I was going to make my own homemade chocolate eggs using some of the suggestions given in the recipe, but found the plastic eggs I had bought had holes (for drainage, I imagine) in each end, so I just went ahead and bought some online from See's. Each box contained six so I bought two boxes, to give me twelve.

 All I did was trim the tops of each egg and dispose of them and the white chocolate chicks from inside each egg. I tell you, this extra chocolate disposal process was a painful one, indeed.

After that was simple. I just mixed together the ingredients for the cheesecake filling, used a sandwich baggie with the corner snipped to fill in each egg, and sat them in the fridge.

Once it was time to add the "yolks", I decided to stray from the recipe and use something even better than fruit sauce. What goes better with chocolate and cheesecake than caramel?? I used Smucker's ice cream topping (the kind in the jar). It worked perfectly.


This was a great recipe and everyone was really impressed with it. The only thing I was unhappy about was that the pretty little egg cup I bought specifically to use when photographing these eggs was too big, so I couldn't use it. But hey, I'll take that kind of regret over my food being nasty/ugly any day.

Sunday, March 17, 2013

St. Patrick's Day Cupcakes

It has been a while since I posted, and the reason for that is a good one - my baby girl was born! At seven pounds and one ounce, and nineteen and a half inches long, she is absolutely beautiful.


Isn't she gorgeous? So, forgive me if I took a bit of time to get back into the blogosphere. But here I am, with something cool - and easy! - for St. Patrick's Day.


I saw these on Pinterest first, and I thought they were adorable. I've been waiting for an opportunity to make them. 

I used store-bought cake mix and frosting - when I'm stopping to feed a baby every forty-five minutes, it's just easier to do it that way. So cut me some slack. The rainbows were made with Airheads Xtremes, and the "pot of gold" was a Rolo.

These are super easy, but everyone will be impressed all the same. This is a cute recipe that's sure to be a hit.

Tuesday, March 5, 2013

Burger Cupcakes

I am really excited about this post, so I'm going to skip the banter usually found in these introductions and get straight to it. I have seen these adorable burger cupcakes all over the internet, a million different times - and every time I see it I pester my husband for his opinion of how cute they are ("Aren't these amazing? Aren't they cool? I so need to make these. How cute are they, on a scale of one to ten?" My husband puts up with so much.)

So finally, I've found (or perhaps invented) an excuse to make my very own version of these awesome cupcakes. I used store-bought frosting, but I made my cupcakes from scratch. Oh, and instead of using brownies for the burger patties as in the original, I used chocolate cupcakes. I love brownies as much as the next person - probably more, if I'm being completely honest with myself - but I thought cake-on-cake would probably taste better and have a better consistency. Plus, I'm not a huge fan of brownies with frosting.

The recipe I used for my yellow cupcakes came from Mel's Kitchen Cafe, and the one for my chocolate cupcakes came from Taste of Home. The latter recipe was meant for making a cake but I changed the baking time to adapt to my cupcakes.

My yield ended up being 39, with about five or so others that were destroyed in the experimentation process. See, my cupcakes didn't turn out nice and even on top like in the pictures. My first ones had giant "muffin tops", and my second batch (which I made smaller after seeing how the first ones came out) had their middles rise but the edges were flat. So I had to mess around with a few before finding the right way to assemble them.

Then came the frosting. I used Wilton food colors - Leaf Green, Buttercup Yellow, and Red-Red. For the final touch, I lightly brushed the top of each "burger" and sprinkled on some gold sugar crystals for the sesame seeds.


Aren't they cool?! Not as perfect as Bakerella's of course, but I'm super happy with them.


Both cake mixes turned out well enough. The yellow cake tasted like a sweet cornbread, I thought, which was fine since there was going to be quite a bit of frosting. The chocolate cake could have been better in my opinion but seeing as it made up only a tiny part of the burger, it hardly mattered. However, if I were going to make a chocolate cake from scratch, I'd definitely opt for a different recipe.

These were a hit and tasted great, so I definitely recommend you give them a try sometime! They're a little labor-intensive, but worth it when everyone tells you again and again how cool they are.

Friday, February 22, 2013

Peanut Butter Fudge

My husband's been having a horrible week at work, so to try and cheer him up, I decided to make him one of his favorite confections:  peanut butter fudge. I've never tried to make any variation of fudge before so I knew beforehand it may have less than satisfactory results, but I decided to give it a try nonetheless. After all, you've got to start somewhere, right?

Easy recipe to follow, takes only minutes - I had my fudge in the fridge to set within fifteen minutes of beginning the whole process. According to the recipe, it only needed an hour (at least) to set, but after four hours, mine was still too soft. Not liquidy by any means, but soft to the point that I had to dig it out of the pan and almost needed a fork to eat it with. I moved it to the freezer and left it there overnight, and that seemed to help.


I think my problem was that I didn't let it come to a complete boil. I was a little paranoid about it burning on the bottom so as soon as it started to boil I pulled it off the heat.

After sitting in the freezer, it's just about the perfect consistency, though the heat from your fingers begins to soften it pretty quickly. That's hardly an issue though since it tastes so good that it's gone before it can start to thaw!

Seriously, this stuff is GOOD. My husband ate some and then proclaimed that it tasted better than his mother's. I can't lie - that made me feel pretty good.

Wednesday, February 20, 2013

Artisan Bread

Today, I have something a little different I'll be talking about. Since I am the possessor of a HUGE sweet tooth, everything I bake is always very sweet. But there's something I've always wanted to try, and that is baking bread.

This is very much out of my comfort zone, so I wasn't expecting spectacular results. I decided to go for simple white bread, figuring once I had the technique down, I could experiment with different flavors (two varieties on my agenda:  cheddar and cinnamon swirl!).

I used a no-knead recipe from The Italian Dish. The recipe is only slightly labor-intensive (I hesitate to say even that) and very easy to follow. I halved the recipe since this is my first time attempting bread and if it turned out disastrous, I didn't want as much carnage lying around to depress me.

My dough before letting it rise, covered.
 
My dough after letting it rise, uncovered - shortly before going into the oven.

My dough rose two hours in a bowl covered with plastic wrap before being placed in the fridge for two more hours. It rose for forty minutes uncovered while the pans preheated in the oven. Finally, I slashed it across the top and put it in the oven, fingers crossed.


That's what it looked like going into the oven. Nice, right? I was tempted to feel impressed with myself, but then I remembered how pretty my cherry danishes were before going into the oven, and I was humbled. I sat waiting anxiously as my bread baked, hoping it wouldn't be a catastrophe.

It baked for only twenty-five minutes. The color looked right ("a dark golden brown") and I didn't want to burn it.

It turned out GORGEOUS!


And not only that, but it tasted awesome. Especially with a thin layer of butter spread over its surface. Mmmm.


My family loved it and we almost ate the entire thing, since everyone had seconds and most of us went back for thirds, too. I know, we're indulgent. But it's that good. And such an easy recipe!

It's dense bread, not light fluffy sandwich bread - though I suspect a sandwich on it would be delicious. It's thick, chewy, and the flavor is phenomenal.

I can't wait to try this recipe again, but this time, with new flavors. I'm getting excited thinking about all the different things I can do with this new skill! Definitely give this one a try, if you can. You won't be disappointed!

Friday, February 15, 2013

Chocolate-Covered Brownie Hearts


Valentine's Day is over, and it's a good thing, too - I was just about sick of seeing pictures of roses and cards and boxes of candy on Facebook. Does that make me sound like a killjoy? Oh well.

I did contribute one photo to the mania that was Facebook yesterday, and that was of my V-Day present to my family - I made them these heart-shaped chocolate-covered brownies. It's an easy recipe, and it turned out looking so fancy!


I made no changes to the ingredients, but I did add a handful of mini chocolate chips, which added three minutes to my cooking time. Oh, and I forgot to spray my foil-lined pan with non-stick spray but luckily my brownies didn't stick.


Didn't they turn out looking nice? Some of my white chocolate didn't go on smoothly but the chocolate drizzles remedied that.


To serve, I followed Kara's suggestion and put them in pretty pink cupcake liners. Everyone said they looked store-bought!


It  may be too late to use this recipe for Valentine's Day, but it could easily be adapted to fit any holiday, or any day in general! The heart-shaped cutter could easily be switched with a star or even just a plain round cutter. For Christmas shapes, the chocolate drizzle could be red or green.

The brownie recipe is great, especially with chocolate chips added. They tasted better than any brownie mix you'd buy at the store!

Wednesday, February 13, 2013

Valentine's Day Cake Pops and Strawberries

I'm not Valentine's Day's biggest fan, but I do have to say I love the goodies that come along with it! It's just about the only time of year I like the color pink, too. I'm not very girly at all - I don't think I even own a pink shirt - but when this time of year comes around, who can resist making everything in pretty shades of pink and red?

Maybe it's just the mass amounts of chocolate consumed that make me feel this way, but enough rambling. Let's get this post started. This is one of two Valentine's Day posts I'm going to be posting. This half of the festivity was made for a Valentine's Day party at my father's work. He requested cake pops and chocolate-covered strawberries.


Both of these pictures were taken from a phone, so sorry if they're not top notch. As you can see, half of the cake pops were white and half were pink. Instead of using melted white chocolate this time, I gave vanilla-flavored almond bark a try. I much preferred it to chocolate. The taste is equally delicious and it's thinner (thus, not as heavy), so it was easier to apply. To decorate I used edible pearls and alternate-colored drizzles.

I used a cake mix to make these, so sue me. You may notice that when it comes to things I intend to spend a significant amount of time on decorating, I opt for mixes. Maybe that's lazy, but I'm sorry if I don't want to spend hours upon hours standing in my kitchen while my one-year-old roams the house screaming. I'm 37 weeks pregnant, also - so cut me some slack.


And here are my berries. Again, I used melted almond bark and melted milk chocolate to dip these, with alternate-colored drizzles. I think the white ones with the pink drizzles look pretty cool.

Everyone loved them, my dad said. Who doesn't love fruit dipped in chocolate and bits of cake on a stick?

Yes, so speaking of me being pregnant - about that. Like I said, I'm 37 weeks along so any time now my little girl will be making her arrival into this world. I'll keep baking and blogging until she gets here, but once she's here, it may be a short while before I can establish a new routine and get back in the groove enough to start blogging again! I'm not talking months and months, just a few weeks maybe. I'm giving you fair warning so you don't get tired of waiting and give up on me.

Anyway, so keep an eye out for Valentine's Day post number two, which I'll have up sometime within the next two days. Until next time!

Tuesday, February 5, 2013

Snickerdoodles


This is yet another post dedicated to something I baked for one of my husband's coworkers. I really ought to start charging. I say that jokingly, but one day when my business is up and booming (fingers crossed!), I really WILL have to.

So today we're talking snickerdoodles. I had never made snickerdoodles before, so I made sure to read all the comments on the recipe post before I did anything else. I'm glad I did, because a few of the suggestions found there were good to know.

I followed this recipe exactly, except regarding one ingredient:  cinnamon. A few comments complained that these cookies lacked the strong cinnamon-y taste associated with snickerdoodles. To ensure that this wouldn't be a problem, I added a few extra shakes of cinnamon to both the dough and the rolling mixture.

The comments also led me to leave my dough rolled in balls on the pan, rather than flattening them as the recipe advises. I had let my dough sit in the fridge for an hour and a half while I ran some errands, so it was nice and easy to handle.

One last change I made was the size of the balls of dough. The recipe suggests each ball consist of about two and a half tablespoons of dough. I made mine smaller. My balls of dough measured about an inch to an inch and a half.

Each pan (one had 12 and the other 15) took fourteen minutes to bake, and I found that to be the perfect amount of time.


These are DELICIOUS. Very soft, without being cake-like, with just a slight crunch around the edges. My one-year-old couldn't get enough. Every bite he took was followed with the most enthusiastic "Mmmmm!" I've ever heard in my life. I was very pleased with the amount of cinnamon, as well. I don't know how it would have been if I hadn't added any extra, but mine were perfect.

The size of my cookies were fairly small, as well - about two inches across - so I can eat more and not feel as guilty about it. Right?

Saturday, January 26, 2013

Homemade Milano Cookies

Have you ever tasted a Milano cookie? They are the most delicious cookie on the face of the earth, hands down, in my opinion. I can (and might have on many occasions) eat an entire bag in one sitting. Granted, they only come twelve or so in a bag, but when the serving size is two cookies, that's pretty bad. (But come on, who eats just two cookies? That's ridiculous.)

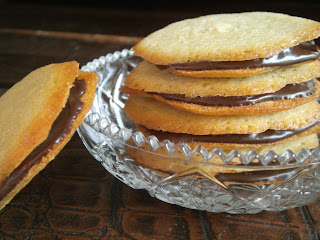
So when I found a recipe for homemade Milanos, I knew I had to try it. Since I prefer the double chocolate variety, I left out the orange zest and the lemon extract.

This recipe was pretty spot on with how many it yielded. In hindsight, I would have preferred more chocolate on each cookie, but that's just a gluttonous personal preference.


In my opinion, they didn't taste much like Milanos. Not that they weren't good - they are, quite good actually, and the chocolate filling is delicious - they just don't remind me of Milanos, other than the way they look. The texture is quite different, as well. They're slightly spongier than Milanos are, though I found when I put a few in the fridge that they became crispier and, thus, closer to the texture of a real Milano.


Not all of my cookies turned out nice and round. Some were bigger than others, some had pointy edges, some even turned out triangular. I wasn't worried about it.

I think this recipe called for too much sugar, so if I try to make these again I'll use less. It's probably not a bad thing that these didn't turn out tasting exactly like Milanos because I'm sure I already eat too many of them as it is - the last thing I need is batches and batches of them sitting around my house. My scale will thank me.

Rose Cake - Strawberry with Vanilla Buttercream

January 24 is my husband's birthday, and his favorite kind of cake is strawberry. So this year I made him a strawberry cake, per his request, and he graciously allowed me to adorn it with roses for practice.

The recipe I used was recommended to me from one of my mother's coworkers - it comes from Paula Deen. I can't decide whether I can truly call it homemade, since instead of adding flour or sugar it calls for a box mix, but the confusion ends there. It's an easy recipe and the addition of gelatin mix makes for an interesting, almost carbonated-tasting kick. The use of frozen strawberries in syrup makes the cake very moist.

The only variation I made in the recipe was the baking time. My cake didn't look done after only twenty minutes, so I left it in a bit longer. It ended up taking twenty-eight minutes total.

For the frosting, I used this recipe. It worked well for me last time so why fix what isn't broken? I ended up running out before my cake was done being decorated, though, so I had to make another half batch. I used butter instead of shortening for this because I had run out of shortening. The color was slightly yellower but my family couldn't tell until I pointed it out.


This is the first layer cake (or rose cake, for that matter) I've made that I actually got to taste, so here's my opinion of the frosting. While it holds its shape perfectly for a rose cake, the roses cause the frosting to be so thick that it's almost too sweet. With this particular cake recipe, the slight tang of the gelatin mix mingled nicely with the sweetness, but with other recipes the sweetness might have been overwhelming. I think next time I'll use less sugar. With a whole two-pound bag of sugar in it, I suppose it's a "DUH" that the frosting would be that sweet, but oh well.

The final verdict:  With this cake, this frosting would be perfect in lesser amounts. With other cakes, I can't say since I haven't tasted it myself, but I imagine that it would be too sweet if paired with a cake recipe that was also super-sweet. Altogether, my cake went over well and I am happy with it. Still a long way to go on my decorating, but I'm getting better!

Wednesday, January 23, 2013

Chocolate-Dipped Decorated Strawberries

My mom needed me to make something for her work's January get-together and she requested chocolate-dipped strawberries. Simple enough. However, I had just seen a Shari's Berries flyer in the mail, and feeling inspired, I decided to do a little more than just dip them in chocolate.

 
As you can see, I used milk and white chocolate to dip my berries in. For decorations, I used silver sugar crystals and edible pearls. And on some of the milk chocolate berries, I drizzled them with white chocolate. I left a few of both plain, just for accent. 

 
My favorites turned out to be the drizzled berries. Maybe that's just because they look so damn fancy.

Sunday, January 13, 2013

White Chocolate Chip Butterscotch Blondies

Last night my brothers had friends over, so I decided to make these white chocolate chip butterscotch blondies as a snack for everyone. I'm generally not a huge butterscotch fan, but it's my husband's favorite and the recipe did look tasty, so I decided to give it a try.

Since I used self-rising flour I left out the salt and baking powder. My blondies took much longer to bake than the recipe said they would, for some reason - according to the recipe it should have only taken twenty to twenty-five minutes, but mine took thirty-nine. I probably could have left them in even longer, too, but I like my brownies gooey and crumbly, and I didn't want them to burn.

They turned out DELICIOUS. My husband said these were his favorite thing that I've ever made. They were great with a glass of milk. We had to eat them with a fork because they were so crumbly but that may have been because we ate them straight out of the oven, without letting them cool. Who does that, anyway? I don't think I've ever let a baked good cool before eating it.


I highly recommend this recipe to everyone! It's absolutely delicious, and super easy. The guys were all standing around saying these were the best things they'd ever tasted. So, it's good for the ego, too. :)

Friday, January 11, 2013

Mini Apple Pies

My mom makes this awesome pastry braid thing for New Year's Day dinner. It's corned beef, cabbage, and Swiss cheese all wrapped up and it's DELICIOUS. This year, she decided to experiment with Pillsbury Crescent Roll Seamless Dough Sheets. She bought two and only used one, so we had one left over.

The point of telling you this is, this leftover pastry dough was the reason I made these mini pies. I was looking for something to make with it and these are what I decided on.

For my filling, I used Pillsbury's Perfect Apple Pie recipe. I changed it up a little bit to suit my tastes - I only used one tablespoon of flour, half a teaspoon of lemon juice, and about one sixteenth of nutmeg (I'm not a huge nutmeg fan). Also, my apples were a little smaller than medium-sized, and they were Granny Smith.

For my baking directions, I followed Dollhouse Bake Shoppe's cues. I baked them at 375 degrees and planned on following her advice to bake for 25 to 30 minutes, but they only took ten. Granted, I only made six mini pies. This is because after six I didn't feel like making anymore. I had loads of filling left over, as you might imagine. With it I plan to make applesauce. If it works out, maybe I'll post that on here too. Who knows.

I'd intended to drop a bit of butter on top of the filling in each pie before adding the lattice, but I forgot. I also forgot to add the egg wash which gives pies such a pretty sheen. At any rate, they turned out lovely enough.


Chocolate Chip Cookie Pie (and Minis)

For a coworker's birthday, my husband asked me to make a baked dessert. I asked what kind - cake, brownies, cookies, what does she like? Answer:  "Something sweet." Alrighty then.

Armed with this vague information that eliminated virtually nothing from the spectrum, I took to the pages bookmarked on my internet browser. Finally I saw something that I'd been eyeballing for a while but hadn't had an excuse to make - Cookie Pie.

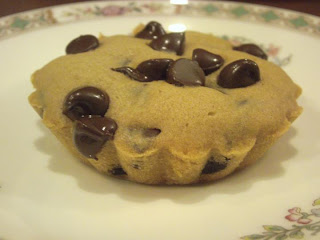
She calls it a pie because she made it in her pie pan, so I'll call it that too, though it has much more of a cake-like consistency than pie, or cookies, for that matter.

Since I was using self-rising flour instead of all purpose, I omitted the baking soda completely. I had read in the comments that some people had found the pie to be too floury, so I also omitted the extra tablespoon of flour called for. I used dark brown sugar, though I'm not sure which kind she used - the recipe only says "brown sugar", but I figured it was worth making a note. Lastly, I used semi-sweet chocolate chips in lieu of M&Ms.

I baked my pie in a 9-inch pie pan, slightly smaller than what she used. Also, I took some of the batter and put it into four mini brioche tins. Since my pie was going away and I wouldn't be able to sample it, I wanted to have a mini-pie for myself to taste. The other three minis were for my husband and two brothers who also happened to be hanging around.

The batter tasted pretty salty, so I was a little worried putting it into the oven, wondering how it would turn out. Everything baked for twenty minutes and was done.


I ended up worrying for basically nothing. In addition to looking perfect, it tasted great, too. The cookie part was a little less sweet than I'd have preferred, but with so much chocolate, it hardly mattered. Next time I make this recipe I think I'll add more sugar. I didn't find it too floury or buttery, as some people commented on the recipe's page. Also, next time I think I'll just make a bunch of minis and forgo the big pie altogether. I love how cute the little scalloped edges are.

Thursday, January 3, 2013

Cake Pops - Birthday

Last time I made cake pops, it was such a fiasco that I pushed all thoughts of cake pops from my mind. Every time I saw pictures of them, no matter how adorable, I resisted the urge to make them myself. However, my brother's birthday is today, and a while ago he informed me that cake pops were what he wanted me to make. I started to refuse, but then figured it had been a while and I've learned a few things since then, so may as well give it another try.

As with last time, I used a boxed cake mix to make my pops. The cake mix called for a cup of water, but my cake pop pan instructions said that for best results, I should substitute milk for water and cut the amount in half. So instead of one cup of water, I used one half-cup of milk. This made my batter thicker and I suspect that's where my problem came from.

Despite coating the pan generously with cooking spray, most of my cake balls broke in half as I opened the pan. I managed to salvage the equivalent of fifteen cake pops.

In order to be able to use the halves, I put melted white chocolate in between them, like a sandwich. There were a few that hadn't broken so I just put them on the sticks, using the melted chocolate as a glue. Then I let them all sit in the refrigerator for a while to set before I decorated them.


That is a Wilton cake pop decorating stand - much better than what I used last time, which was a styrofoam block that tipped over because my pops were too heavy.


This photo is just a close-up so you can see how I glued my cake pop halves together with chocolate.

After they set in the fridge, I started to decorate. I used green and blue food coloring and sprinkles. The finished product, though simple, looked very nice.


Some of the pops that had been glued together with chocolate were too heavy, so they began to come off their sticks when dipped in chocolate. To remedy this, I enlisted the help of my step-daughter. I held the pop together between its stick and a toothpick while she added the sprinkles.

This batch of cake pops, while simpler in design than my last batch, I found to be much more visually appealing - and a lot more fun to make. I think this is because last time I made them I had no idea what I was getting into. The internet made cake pops look so easy and adorable - I didn't know much about what I was doing, what supplies were needed, etc. There are a hundred different problems you can run into making cake pops, and though I've barely scratched the surface of the art of cake-pop making, I feel a lot more prepared. I know now that cake pops aren't as easy as they look and, what's more, I've learned to not let myself lose track of the fun that baking is supposed to be by comparing what I make with the masterpieces produced by others. There will ALWAYS be someone better than me, and that's ok! As long as I love what I'm doing, I will keep doing it.