Showing posts with label Cookies. Show all posts

Saturday, July 6, 2013

Fourth of July Flag Sugar Cookies

We go to the same Fourth of July party every year, and every year I try to make something different. Last year I took key lime pie bars. This year, I made sugar cookies decorated like a flag. These were inspired by the lovely Sugarbelle.

I made two batches which yielded almost 150 cookies. I used the same recipe for sugar cookies as I always do - only because it's the best sugar cookie recipe ever. It's soft, not too sweet, and pairs perfectly with the sweet royal icing (to which that link above also leads). Days after being made these cookies are still delicious.


With the first few cookies that went into the oven, they weren't flattening out enough to be frosted, so we turned them into some impromptu chocolate macarons.


I made several batches of the icing, and after many hours of standing I finally finished. In the morning, after the icing had set, I arranged them to look like a flag.


The red could have been a little darker but overall, I think they turned out really cute! They were pretty tedious, though. That's why I rarely make sugar cookies, and that's why it will be a HELL of a long time before I do a job making 150 again. That's an absurd amount of sugar cookies!

Tuesday, February 5, 2013

Snickerdoodles


This is yet another post dedicated to something I baked for one of my husband's coworkers. I really ought to start charging. I say that jokingly, but one day when my business is up and booming (fingers crossed!), I really WILL have to.

So today we're talking snickerdoodles. I had never made snickerdoodles before, so I made sure to read all the comments on the recipe post before I did anything else. I'm glad I did, because a few of the suggestions found there were good to know.

I followed this recipe exactly, except regarding one ingredient:  cinnamon. A few comments complained that these cookies lacked the strong cinnamon-y taste associated with snickerdoodles. To ensure that this wouldn't be a problem, I added a few extra shakes of cinnamon to both the dough and the rolling mixture.

The comments also led me to leave my dough rolled in balls on the pan, rather than flattening them as the recipe advises. I had let my dough sit in the fridge for an hour and a half while I ran some errands, so it was nice and easy to handle.

One last change I made was the size of the balls of dough. The recipe suggests each ball consist of about two and a half tablespoons of dough. I made mine smaller. My balls of dough measured about an inch to an inch and a half.

Each pan (one had 12 and the other 15) took fourteen minutes to bake, and I found that to be the perfect amount of time.


These are DELICIOUS. Very soft, without being cake-like, with just a slight crunch around the edges. My one-year-old couldn't get enough. Every bite he took was followed with the most enthusiastic "Mmmmm!" I've ever heard in my life. I was very pleased with the amount of cinnamon, as well. I don't know how it would have been if I hadn't added any extra, but mine were perfect.

The size of my cookies were fairly small, as well - about two inches across - so I can eat more and not feel as guilty about it. Right?

Saturday, January 26, 2013

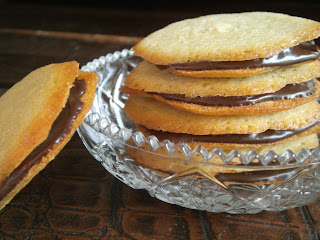
Homemade Milano Cookies

Have you ever tasted a Milano cookie? They are the most delicious cookie on the face of the earth, hands down, in my opinion. I can (and might have on many occasions) eat an entire bag in one sitting. Granted, they only come twelve or so in a bag, but when the serving size is two cookies, that's pretty bad. (But come on, who eats just two cookies? That's ridiculous.)

So when I found a recipe for homemade Milanos, I knew I had to try it. Since I prefer the double chocolate variety, I left out the orange zest and the lemon extract.

This recipe was pretty spot on with how many it yielded. In hindsight, I would have preferred more chocolate on each cookie, but that's just a gluttonous personal preference.


In my opinion, they didn't taste much like Milanos. Not that they weren't good - they are, quite good actually, and the chocolate filling is delicious - they just don't remind me of Milanos, other than the way they look. The texture is quite different, as well. They're slightly spongier than Milanos are, though I found when I put a few in the fridge that they became crispier and, thus, closer to the texture of a real Milano.


Not all of my cookies turned out nice and round. Some were bigger than others, some had pointy edges, some even turned out triangular. I wasn't worried about it.

I think this recipe called for too much sugar, so if I try to make these again I'll use less. It's probably not a bad thing that these didn't turn out tasting exactly like Milanos because I'm sure I already eat too many of them as it is - the last thing I need is batches and batches of them sitting around my house. My scale will thank me.

Friday, January 11, 2013

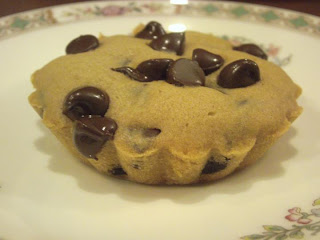
Chocolate Chip Cookie Pie (and Minis)

For a coworker's birthday, my husband asked me to make a baked dessert. I asked what kind - cake, brownies, cookies, what does she like? Answer:  "Something sweet." Alrighty then.

Armed with this vague information that eliminated virtually nothing from the spectrum, I took to the pages bookmarked on my internet browser. Finally I saw something that I'd been eyeballing for a while but hadn't had an excuse to make - Cookie Pie.

She calls it a pie because she made it in her pie pan, so I'll call it that too, though it has much more of a cake-like consistency than pie, or cookies, for that matter.

Since I was using self-rising flour instead of all purpose, I omitted the baking soda completely. I had read in the comments that some people had found the pie to be too floury, so I also omitted the extra tablespoon of flour called for. I used dark brown sugar, though I'm not sure which kind she used - the recipe only says "brown sugar", but I figured it was worth making a note. Lastly, I used semi-sweet chocolate chips in lieu of M&Ms.

I baked my pie in a 9-inch pie pan, slightly smaller than what she used. Also, I took some of the batter and put it into four mini brioche tins. Since my pie was going away and I wouldn't be able to sample it, I wanted to have a mini-pie for myself to taste. The other three minis were for my husband and two brothers who also happened to be hanging around.

The batter tasted pretty salty, so I was a little worried putting it into the oven, wondering how it would turn out. Everything baked for twenty minutes and was done.


I ended up worrying for basically nothing. In addition to looking perfect, it tasted great, too. The cookie part was a little less sweet than I'd have preferred, but with so much chocolate, it hardly mattered. Next time I make this recipe I think I'll add more sugar. I didn't find it too floury or buttery, as some people commented on the recipe's page. Also, next time I think I'll just make a bunch of minis and forgo the big pie altogether. I love how cute the little scalloped edges are.

Sunday, December 23, 2012

Apocalypse Cookies

As we all know, the world was supposed to end on December 21 (according to the Mayans), but obviously that didn't happen. Just in case, I made these zombie sugar cookies to celebrate.

I used a different recipe this time, since I am wanting to find one that holds its shape well. This time I used Sweetopia's. I used the same icing recipe from my Christmas cookies, though.

I made a few changes to the recipe. We only had four sticks of unsalted butter so I had to sub one half cup of salted. I'm not sure whether that makes a difference, but oh well. Also, with all the baking that's been going on around here, we ran out of all-purpose flour when I still needed a cup and a half. So I had to borrow a neighbor's, and it turned out to be self-rising. Again, I'm not sure whether this made a difference or not, but I figured I'd make a note of it.

I cut my cookies pretty thick, considerably thicker than the recipe advises, and I know that affected their spreading. My dough yielded thirty three cookies which I split into three batches. My first batch had fifteen cookies on the pan, which I didn't realize was too many until they began to bake. They baked for 16 minutes and afterwards I used a knife to separate them. They still held their shape well, they were just very fat zombies.

My second batch only took 13 minutes, but they were more spread out. My third batch only had six and they took ten minutes. This last batch was the thinnest of them all and they held their shape great.


To create the "ripped off limb" look, I simply took a knife and severed a leg here and an arm there.

 
These were my favorites. The left one in the bottom row is supposed to have his brain showing. I used a black edible marker to draw the eyes, mouths, and brain squiggles.
 
 
Congratulations on surviving the apocalypse, everyone!

Wednesday, December 12, 2012

Christmas Cookies

I tend to get ahead of myself when I think about baking. I have all these ideas and see all these awesome things on the internet that I want to try, so at any given time I have all the things I'm going to bake planned up to two months ahead. This isn't always true but most of the time, it is. I can't help it - I just get excited seeing all the cute recipes and decorating techniques and I want to try them myself.

This recipe is one of those planned months in advance. I've been wanting to decorate Christmas cookies, but every time I've made sugar cookies to decorate, instead of keeping their little ornament and Santa shapes they spread out in the oven and turn into horrible amorphous blobs. These are still tasty and frostable, but it's not what I wanted, and I KNOW it is possible to have a cookie keep its candy cane shape because it's all over the internet...so why can't I do it?

If you haven't noticed, I get on these kicks when it comes to my favorite bloggers. A while ago it was Brown Eyed Baker. Now, it seems that I've become infatuated by Amanda at i am baker. I just knew she'd have a perfect sugar cookie recipe, and I was right.

I followed both her recipe for the cookies and the icing - both can be found here. However, to ice them, I also used her decorating tutorial. (That's one of the reasons I love her so much - she offers so many awesome tutorials and makes it so easy!)

I only put one teaspoon of almond flavor into the cookie dough, and found it to be enough. Any more I think would have been overwhelming. After refrigerating the dough for one hour I had problems with it being too sticky, so I let it sit in the fridge until the following evening. It still stuck to my cutting board, so instead of using the cookie cutters I've been SO WANTING to use, I just molded my cookies into circles and decided I'd make do.

My dough yielded twenty-four cookies, plus a little extra dough that I may or may not have eaten. (You'll never know.) Each batch of twelve cooked for thirteen minutes. The cookies turned out great, not excruciatingly sweet but good enough to eat on their own without icing.

The icing part was what took the longest, as you might have suspected. I feel as though I complicate things, that there is always an easier way to do things than the way I do them, but I'm not sure. Anyway, I ended up making about five batches of Amanda's icing. I was up until three in the morning icing them - I made twelve designs, two of each.


My winter cookies were my favorite. I think it's partly because of the nice blue/white contrast. Surprisingly, these were the first ones I did. Usually the first ones I do are the worst because I haven't settled into a groove yet.


And these are my Christmas cookies. My mint turned out the worst, so I slyly set it to the side so it wouldn't be in the picture so much. My tree was supposed to have a yellow star at the top, and the green "Ho Ho" cookie was supposed to have a candy cane on it, but doing that would have required another batch of frosting, and at three in the morning I was ok with settling for less. I had a little trouble with my red frosting running; that means I added too much milk. Can you see the little edible pearls in the picture? I've had them for a while and couldn't wait for an opportunity to use them.

All in all, I'm very happy with my cookies. They didn't turn out as shapes, but I think I adapted well and at any rate, they taste good, and that's the most important thing!

Wednesday, October 10, 2012

Chocolate Chip Cookie Dunkers

So my husband has been out of work with a kidney stone. He's been feeling really low for a while so when he asked me to make him cookies, I could hardly refuse. Even though he asked me at two in the morning.

So I used My Baking Addiction's recipe for Cookie Sticks. I omitted the peanut butter and peanut butter chips since I don't like peanut butter cookies and added a bunch more chocolate chips.

These didn't last long.

They turned out nicely, a little tougher than I prefer my cookies but not crunchy by any means. I'm just weird and like my cookies and brownies gooey. :)

As you can see, the cookies being cut into strips made dunking into milk much easier and convenient. My husband was pleased.

Tuesday, July 24, 2012

Easter Basket Cookies

Anti-chronologically, we have gone from Father's Day to Mother's Day, and now to Easter. I had no idea I was so out of order. Wow.

This recipe is one of Betty Crocker's. It's simple, but the finished product is awesome - and everyone who saw them complimented them.

The first problem I ran into while preparing these cookies was after they came out of the oven. I must not have let them cool long enough - either that, or I didn't spray enough PAM into the pan. Either way, the bottoms became separated from the top. Some, we were able to "glue" together with icing. Others I was forced to abandon and eat myself - it's a painful job, but somebody had to do it. ;)

The orange one here is one of the ones we were able to save.


I pretty much followed the rest of the recipe exactly, except for one bit - instead of using small ribbons for the basket handles, I used pieces of Twizzlers that I had untwined. I filled each basket with a bit of dyed-green coconut for the "grass", then gave each a few mini chocolate Cadbury eggs. The result was adorable.

Aren't they cute?

A single cookie, for your viewing pleasure.

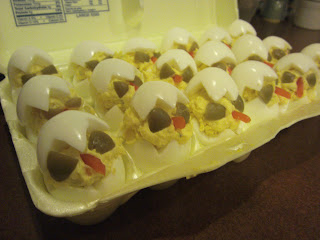
I couldn't conclude this post without mention of my other Easter creation. They are devilled eggs, made to look like chicks. I did not follow any recipe for these, but I did get the idea from a Google search. I don't remember the website to give credit, though I do know they were featured on Rachael Ray's show. 


Thursday, January 26, 2012

Caramel-Stuffed Chocolate Truffle Cookies

I am finding that my family is very supportive of my decision to become a baker. They have all volunteered to be my guinea pigs. It is nice to have family that supports you, even if they are all a bunch of moochers who just like you for your baked goods.

Today's goodies came from another Pillsbury recipe - Salted Caramel-Stuffed Chocolate Truffle Cookies. I get emails from Pillsbury, so oftentimes as I'm reading my emails I see something I like and, because I'm fat and indulgent, I run off to the kitchen to make my fantasy come true. So anyways I saw the recipe and I made it the next day.


The recipe claims that this recipe will make thirty cookies. That was not true, at least in my case. I did eat some of the batter, but there's no way I ate fourteen cookies worth of it. Sixteen cookies came out at the end, but out of those, only about ten really survived. These cookies are VERY crumbly, which is totally understandable seeing as they each contain a melted Rolo in their middle.

My advice to you would be to wait to eat them until the next day, when they aren't warm and melty and mmm.... But really, wait until tomorrow to eat them. They won't fall apart and are still so damn good.

I did not put any salt on top of them. I did put half a teaspoon in the mix, as the recipe called for, but I did not sprinkle any on the tops. Maybe I will next time. They didn't seem to need it.

If you read the reviews, many people complain that these are too messy. I wouldn't agree. They are a little messy, but not so messy that I would refuse to make them again. They are too good to complain about the mess. Trust me, it's worth it.


CARAMEL-STUFFED CHOCOLATE TRUFFLE COOKIES
(Adapted from Pillsbury)
Yield:  20-25 cookies

COOKIES:
  • 1 roll (16.5 oz)  refrigerated chocolate chip cookies
  • 1/3 cup unsweetened baking cocoa                        
  • 1/4 cup whipping cream                        
  • 1/2 teaspoon coarse salt
  • 1/2 cup mini semisweet chocolate chips                        
  • 30 Rolos (from 12-oz bag), unwrapped

TOPPING:
  • 20 Rolos, unwrapped
  • 2 tablespoons whipping cream

DIRECTIONS:
  1. Let cookie dough stand at room temperature 10 minutes to soften. Heat oven to 350°F.
  2. In large bowl, mix cocoa, whipping cream and 1/2 teaspoon salt with wooden spoon until well blended. Crumble cookie dough into cocoa mixture; add chocolate chips, and stir until well blended. Place dough in freezer 15 minutes for easier handling.
  3. Using measuring tablespoon or small ice cream scoop, shape dough into 30 balls. Freeze 15 minutes. Place 1 caramel inside each dough ball, covering completely and reshaping ball around caramel. Dough will be sticky; wet hands slightly if helpful. Place balls 2 inches apart on ungreased cookie sheets.
  4. Bake 9 to 13 minutes or until edges of cookies are set. Cool on cookie sheets 2 minutes; remove to cooling racks. Cool completely, about 20 minutes.
  5. Meanwhile, in small microwave bowl, microwave 20 caramels and 2 tablespoons whipping cream uncovered on High 45 seconds to 1 minute 15 seconds, stirring every 15 seconds or until caramel is melted and mixture is smooth.
  6. Spoon or drizzle caramel over cookies.

Wednesday, January 25, 2012

Turkey Cookies

I want to begin by letting everyone know that I have never had a blog before, so if this is terribly boring, or if I ramble, which I tend to do, take it easy on me. I am a blog virgin. We all have to start somewhere, don't we?

The point of this blog is to document my journey through baking. Presently, I would consider myself a pretty good baker, though others might disagree. :( I hope not. Anyway, I would like to become an expert baker, and if all goes according to plan, I would love to do it for a job. The purpose of this blog is to record my successes, failures, and everything in between, so that maybe I will learn from it somewhere down the road. When I am a Great Baker.

So. The first stop on this journey to greatness is the super-basic Sugar Cookies Decorated to Look Like Something. In this case, I decorated them to look like turkeys. It was for Thanksgiving. I used Pillsbury sugar cookie dough, and this recipe - Thanksgiving Turkey Cookies.

They turned out cute as hell, of course. I mean, it's hard to mess up a recipe as simple as this one. My dear brothers helped me decorate, so some of the faces turned out looking...well, special. But I marked this one down as a Success.

Aren't they just presh?

Something I would do differently in the future is, I would not use so much chocolate frosting across the top to hold on the "feathers". It was too rich, I thought. A precaution to anyone who might make this recipe themselves:  The gel that goes on the eyes never hardens, so to keep them from getting stale, you pretty much have to put them in a Tupperware container or something similar. Maybe this is common knowledge, but there you go.

The finished product. :)

They were a hit at our family get-together. The kids loved them, and the adults thought they were cute. My mother asked why the eyes were crossed. I told her that one was decorated by my brother.