Showing posts with label Holiday. Show all posts

Saturday, July 6, 2013

Fourth of July Flag Sugar Cookies

We go to the same Fourth of July party every year, and every year I try to make something different. Last year I took key lime pie bars. This year, I made sugar cookies decorated like a flag. These were inspired by the lovely Sugarbelle.

I made two batches which yielded almost 150 cookies. I used the same recipe for sugar cookies as I always do - only because it's the best sugar cookie recipe ever. It's soft, not too sweet, and pairs perfectly with the sweet royal icing (to which that link above also leads). Days after being made these cookies are still delicious.


With the first few cookies that went into the oven, they weren't flattening out enough to be frosted, so we turned them into some impromptu chocolate macarons.


I made several batches of the icing, and after many hours of standing I finally finished. In the morning, after the icing had set, I arranged them to look like a flag.


The red could have been a little darker but overall, I think they turned out really cute! They were pretty tedious, though. That's why I rarely make sugar cookies, and that's why it will be a HELL of a long time before I do a job making 150 again. That's an absurd amount of sugar cookies!

Monday, July 1, 2013

Father's Day - Lemon Bars/Key Lime Pie Bars

I never know what to make for Father's Day because neither my dad nor my husband have much of a sweet tooth. I know, I know - they're inhuman. So for this year's dessert, I decided to go with a recipe I've been eyeballing for a long time. Just as I was about to make it, my mom asked me to make a certain recipe in addition. So I ended up making two different kinds of bars.

The first was something I'd made before - key lime pie bars. (Here's the link to when I made them the first time.) The crust on these bars is to die for - and I suppose you could take that literally, since they're probably unhealthy as hell.


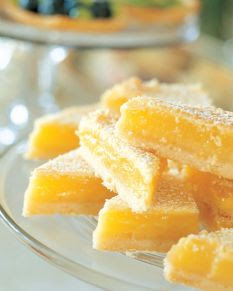
In addition, I made something I'd never made before, but had been wanting to for a long time - Ina Garten's lemon bars. These turned out absolutely delicious! The bottom layer was almost like a sugar cookie. They were sweet but very tangy as well, which is just the way I like my lemon confections. Oftentimes lemon-flavored stuff is way too sweet and it's just too overbearing for my palate. These, however, were absolutely perfect.


Just for the record (and so I don't get sued or something), neither of those pictures are mine. I forgot to take pictures, unfortunately. :(

These citrus bars are a great combo for any get-together. They are both delicious, tangy, and light enough to eat after a big meal. Everyone at our party was raving about them!


KEY LIME PIE BARS
(Adapted from My Baking Addiction)
Yield:  16 bars

CRUST:
  • 1 1/2 cups crushed graham crackers (about 2/3 of a sleeve)
  • 2 tablespoons sugar
  • 1/3 cup butter, melted
  • 1/2 cup sweetened flaked coconut
FILLING:
  • 3 cups sweetened condensed milk
  • 1/2 cup sour cream
  • 3/4 cup key lime juice (I used Nelly and Joes Key Lime Juice)
  • 1 tablespoon grated lime zest
DIRECTIONS:
CRUST: 
  1. In a small bowl, combine the crumbs, coconut and sugar; add butter and blend well. Press onto the bottom of a nine inch springform pan.
  2. Bake at 350 degrees for 8 minutes; cool on wire rack.
FILLING:
  1. Preheat oven to 350 degrees F (175 degrees C).
  2. In a medium bowl, combine condensed milk, sour cream, lime juice, and lime rind. Mix well and pour into graham cracker crust.
  3. Bake in preheated oven for 5 to 8 minutes, until tiny pinhole bubbles burst on the surface of pie. DO NOT BROWN! Chill pie thoroughly before serving. Cut into 16 bars; garnish with powdered sugar.


LEMON BARS
(Adapted from Barefoot Contessa)
Yield:  20 bars

CRUST:
  • 1/2 pound unsalted butter at room temperature
  • 1/2 cup granulated sugar
  • 2 cups all-purpose flour
  • 1/8 teaspoon salt
FILLING:
  • 6 extra-large eggs at room temperature
  • 3 cups granulated sugar
  • 2 tablespoons grated lemon zest (4 to 6 lemons)
  • 1 cup freshly squeezed lemon juice
  • 1 cup all-purpose flour
  • Powdered sugar, for dusting
DIRECTIONS:
  1. Preheat the oven to 350 degrees.
  2. For the crust, cream the butter and sugar until light in the bowl of an electric mixer fitted with the paddle attachment. Combine the flour and salt and, with the mixer on low, add to the butter until just mixed. Dump the dough onto a well-floured board and gather into a ball. Flatten the dough with floured hands and press it into a 9 x 13 x 2-inch baking sheet, building up a 1/2-inch edge on all sides. Chill.
  3. Bake the crust for 15 to 20 minutes, until very lightly browned. Let cool on a wire rack. Leave the oven on.
  4. For the filling, whisk together the eggs, sugar, lemon zest, lemon juice, and flour. Pour over the crust and bake for 30 to 35 minutes, until the filling is set. Let cool to room temperature.
  5. Cut into squares and dust with powdered sugar.

Monday, April 8, 2013

Cheesecake-Filled Chocolate Eggs

Wow, it's been over a week since Easter, yet here I am just now getting to my Easter post. Shame on me!

I found these beautiful cheesecake-filled chocolate eggs a while ago, and couldn't wait to make them. I was going to make my own homemade chocolate eggs using some of the suggestions given in the recipe, but found the plastic eggs I had bought had holes (for drainage, I imagine) in each end, so I just went ahead and bought some online from See's. Each box contained six so I bought two boxes, to give me twelve.

 All I did was trim the tops of each egg and dispose of them and the white chocolate chicks from inside each egg. I tell you, this extra chocolate disposal process was a painful one, indeed.

After that was simple. I just mixed together the ingredients for the cheesecake filling, used a sandwich baggie with the corner snipped to fill in each egg, and sat them in the fridge.

Once it was time to add the "yolks", I decided to stray from the recipe and use something even better than fruit sauce. What goes better with chocolate and cheesecake than caramel?? I used Smucker's ice cream topping (the kind in the jar). It worked perfectly.


This was a great recipe and everyone was really impressed with it. The only thing I was unhappy about was that the pretty little egg cup I bought specifically to use when photographing these eggs was too big, so I couldn't use it. But hey, I'll take that kind of regret over my food being nasty/ugly any day.

Sunday, March 17, 2013

St. Patrick's Day Cupcakes

It has been a while since I posted, and the reason for that is a good one - my baby girl was born! At seven pounds and one ounce, and nineteen and a half inches long, she is absolutely beautiful.


Isn't she gorgeous? So, forgive me if I took a bit of time to get back into the blogosphere. But here I am, with something cool - and easy! - for St. Patrick's Day.


I saw these on Pinterest first, and I thought they were adorable. I've been waiting for an opportunity to make them. 

I used store-bought cake mix and frosting - when I'm stopping to feed a baby every forty-five minutes, it's just easier to do it that way. So cut me some slack. The rainbows were made with Airheads Xtremes, and the "pot of gold" was a Rolo.

These are super easy, but everyone will be impressed all the same. This is a cute recipe that's sure to be a hit.

Friday, February 15, 2013

Chocolate-Covered Brownie Hearts


Valentine's Day is over, and it's a good thing, too - I was just about sick of seeing pictures of roses and cards and boxes of candy on Facebook. Does that make me sound like a killjoy? Oh well.

I did contribute one photo to the mania that was Facebook yesterday, and that was of my V-Day present to my family - I made them these heart-shaped chocolate-covered brownies. It's an easy recipe, and it turned out looking so fancy!


I made no changes to the ingredients, but I did add a handful of mini chocolate chips, which added three minutes to my cooking time. Oh, and I forgot to spray my foil-lined pan with non-stick spray but luckily my brownies didn't stick.


Didn't they turn out looking nice? Some of my white chocolate didn't go on smoothly but the chocolate drizzles remedied that.


To serve, I followed Kara's suggestion and put them in pretty pink cupcake liners. Everyone said they looked store-bought!


It  may be too late to use this recipe for Valentine's Day, but it could easily be adapted to fit any holiday, or any day in general! The heart-shaped cutter could easily be switched with a star or even just a plain round cutter. For Christmas shapes, the chocolate drizzle could be red or green.

The brownie recipe is great, especially with chocolate chips added. They tasted better than any brownie mix you'd buy at the store!

Wednesday, February 13, 2013

Valentine's Day Cake Pops and Strawberries

I'm not Valentine's Day's biggest fan, but I do have to say I love the goodies that come along with it! It's just about the only time of year I like the color pink, too. I'm not very girly at all - I don't think I even own a pink shirt - but when this time of year comes around, who can resist making everything in pretty shades of pink and red?

Maybe it's just the mass amounts of chocolate consumed that make me feel this way, but enough rambling. Let's get this post started. This is one of two Valentine's Day posts I'm going to be posting. This half of the festivity was made for a Valentine's Day party at my father's work. He requested cake pops and chocolate-covered strawberries.


Both of these pictures were taken from a phone, so sorry if they're not top notch. As you can see, half of the cake pops were white and half were pink. Instead of using melted white chocolate this time, I gave vanilla-flavored almond bark a try. I much preferred it to chocolate. The taste is equally delicious and it's thinner (thus, not as heavy), so it was easier to apply. To decorate I used edible pearls and alternate-colored drizzles.

I used a cake mix to make these, so sue me. You may notice that when it comes to things I intend to spend a significant amount of time on decorating, I opt for mixes. Maybe that's lazy, but I'm sorry if I don't want to spend hours upon hours standing in my kitchen while my one-year-old roams the house screaming. I'm 37 weeks pregnant, also - so cut me some slack.


And here are my berries. Again, I used melted almond bark and melted milk chocolate to dip these, with alternate-colored drizzles. I think the white ones with the pink drizzles look pretty cool.

Everyone loved them, my dad said. Who doesn't love fruit dipped in chocolate and bits of cake on a stick?

Yes, so speaking of me being pregnant - about that. Like I said, I'm 37 weeks along so any time now my little girl will be making her arrival into this world. I'll keep baking and blogging until she gets here, but once she's here, it may be a short while before I can establish a new routine and get back in the groove enough to start blogging again! I'm not talking months and months, just a few weeks maybe. I'm giving you fair warning so you don't get tired of waiting and give up on me.

Anyway, so keep an eye out for Valentine's Day post number two, which I'll have up sometime within the next two days. Until next time!

Monday, December 24, 2012

Chocolate Marshmallow Penguins

It's late Christmas Eve - actually, being 12:10 a.m., it's technically Christmas - but I wanted to go ahead and post this since my son is asleep and God only knows when the next free moment will occur. This recipe was inspired by something seen on Pinterest.

Obviously, if you read this post's title, you'll notice I used marshmallows instead of strawberries. I did this because not too long ago I made a recipe using strawberries for a family function, and I didn't want to make something that might seem too similar. So, I used marshmallows.

These were simply dipped in melted chocolate, and the faces were drawn on with Wilton edible markers.

 
These were really easy and turned out yummy - not to mention totally adorable. I only used half a bag of marshmallows, so my batch yielded 22 penguins. It took hardly any time at all. The longest part was waiting for the chocolate to set, and even that didn't take long. If you're looking for something that will catch everyone's eye but don't want to put much effort into it, this is the recipe for you!

Wednesday, December 12, 2012

Christmas Cookies

I tend to get ahead of myself when I think about baking. I have all these ideas and see all these awesome things on the internet that I want to try, so at any given time I have all the things I'm going to bake planned up to two months ahead. This isn't always true but most of the time, it is. I can't help it - I just get excited seeing all the cute recipes and decorating techniques and I want to try them myself.

This recipe is one of those planned months in advance. I've been wanting to decorate Christmas cookies, but every time I've made sugar cookies to decorate, instead of keeping their little ornament and Santa shapes they spread out in the oven and turn into horrible amorphous blobs. These are still tasty and frostable, but it's not what I wanted, and I KNOW it is possible to have a cookie keep its candy cane shape because it's all over the internet...so why can't I do it?

If you haven't noticed, I get on these kicks when it comes to my favorite bloggers. A while ago it was Brown Eyed Baker. Now, it seems that I've become infatuated by Amanda at i am baker. I just knew she'd have a perfect sugar cookie recipe, and I was right.

I followed both her recipe for the cookies and the icing - both can be found here. However, to ice them, I also used her decorating tutorial. (That's one of the reasons I love her so much - she offers so many awesome tutorials and makes it so easy!)

I only put one teaspoon of almond flavor into the cookie dough, and found it to be enough. Any more I think would have been overwhelming. After refrigerating the dough for one hour I had problems with it being too sticky, so I let it sit in the fridge until the following evening. It still stuck to my cutting board, so instead of using the cookie cutters I've been SO WANTING to use, I just molded my cookies into circles and decided I'd make do.

My dough yielded twenty-four cookies, plus a little extra dough that I may or may not have eaten. (You'll never know.) Each batch of twelve cooked for thirteen minutes. The cookies turned out great, not excruciatingly sweet but good enough to eat on their own without icing.

The icing part was what took the longest, as you might have suspected. I feel as though I complicate things, that there is always an easier way to do things than the way I do them, but I'm not sure. Anyway, I ended up making about five batches of Amanda's icing. I was up until three in the morning icing them - I made twelve designs, two of each.


My winter cookies were my favorite. I think it's partly because of the nice blue/white contrast. Surprisingly, these were the first ones I did. Usually the first ones I do are the worst because I haven't settled into a groove yet.


And these are my Christmas cookies. My mint turned out the worst, so I slyly set it to the side so it wouldn't be in the picture so much. My tree was supposed to have a yellow star at the top, and the green "Ho Ho" cookie was supposed to have a candy cane on it, but doing that would have required another batch of frosting, and at three in the morning I was ok with settling for less. I had a little trouble with my red frosting running; that means I added too much milk. Can you see the little edible pearls in the picture? I've had them for a while and couldn't wait for an opportunity to use them.

All in all, I'm very happy with my cookies. They didn't turn out as shapes, but I think I adapted well and at any rate, they taste good, and that's the most important thing!

Friday, November 9, 2012

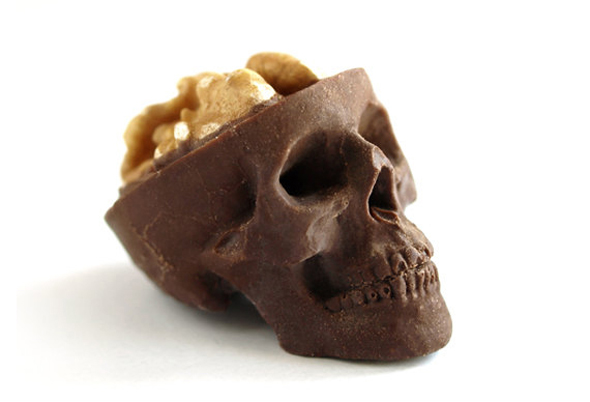
White Chocolate Skulls with Walnut Brains

So during the week before Halloween, I thought it would be fun to recreate something I'd seen on Pinterest. I didn't see a recipe for it, so unfortunately no link for that, but the construction was simple enough. Here's the picture that inspired me...


Chocolate skulls with walnut brains! Spooky.

I decided mine would be white chocolate, and I'd use pink-tinted white chocolate to glaze over the walnuts to look like a brain. The silicone mold I used was bought at Wal-Mart for ninety-nine cents and was supposed to be an ice cube tray, but I figured it would work the same.

If you've been following my blog, you may remember that I used to have trouble melting chocolate. I can now melt it perfectly fine, however I cannot temper it. I read somewhere that tempering could be achieved by melting a bit of the chocolate and then adding small chunks one at a time until it was all melted. I tried this, and it didn't work. The chocolate turned out tasty enough, but it had teeny-tiny crystalline particles which, while not altogether unpleasant, aren't what you expect when biting into a piece of chocolate; additionally, it melted VERY quickly and did not have that beautiful shiny exterior that chocolate is supposed to have.


Oh, and did I mention the trouble I had getting my skulls out of their mold? After pouring the liquid chocolate into the mold, I sat it in the fridge for five minutes and then brought it back out and let it set on the counter overnight. I had read somewhere (and I sure wish I could find the website I used for this information) that any longer could cause the sugar in the chocolate to adhere to the mold and make it stick. Well, the next morning I found that my chocolates had STILL not set. I finally got agitated and figured "to hell with it" and put them in the freezer. This solved the problem - they fell right out of the mold (with a little bending and twisting).

I sliced off the tops of their skulls right above their eyes and placed a small dab of pink-tinted white chocolate to serve as glue for the walnuts. Originally I'd thought walnut halves were what I needed, but as small as the chocolates turned out to be I only used a fourth on each skull. After letting that set for a moment, I used a small paintbrush to glaze over my brains.

See the rough surface? Boo.

In retrospect, I should have added more red food coloring to the chocolate. It looked pink enough in the pan and I didn't want it to look red which is why I stopped when I did. Hindsight's 20/20, though.

In conclusion, this is a VERY cool project that had lots of potential, though due to misinformation and lack of tempering knowledge it could have turned out better. I think I'll use a better mold next time, as well. Preferably one that's more three-dimensional.

Tuesday, July 24, 2012

Easter Basket Cookies

Anti-chronologically, we have gone from Father's Day to Mother's Day, and now to Easter. I had no idea I was so out of order. Wow.

This recipe is one of Betty Crocker's. It's simple, but the finished product is awesome - and everyone who saw them complimented them.

The first problem I ran into while preparing these cookies was after they came out of the oven. I must not have let them cool long enough - either that, or I didn't spray enough PAM into the pan. Either way, the bottoms became separated from the top. Some, we were able to "glue" together with icing. Others I was forced to abandon and eat myself - it's a painful job, but somebody had to do it. ;)

The orange one here is one of the ones we were able to save.


I pretty much followed the rest of the recipe exactly, except for one bit - instead of using small ribbons for the basket handles, I used pieces of Twizzlers that I had untwined. I filled each basket with a bit of dyed-green coconut for the "grass", then gave each a few mini chocolate Cadbury eggs. The result was adorable.

Aren't they cute?

A single cookie, for your viewing pleasure.

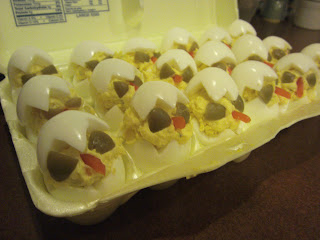
I couldn't conclude this post without mention of my other Easter creation. They are devilled eggs, made to look like chicks. I did not follow any recipe for these, but I did get the idea from a Google search. I don't remember the website to give credit, though I do know they were featured on Rachael Ray's show.