Showing posts with label Bars. Show all posts

Monday, July 1, 2013

Father's Day - Lemon Bars/Key Lime Pie Bars

I never know what to make for Father's Day because neither my dad nor my husband have much of a sweet tooth. I know, I know - they're inhuman. So for this year's dessert, I decided to go with a recipe I've been eyeballing for a long time. Just as I was about to make it, my mom asked me to make a certain recipe in addition. So I ended up making two different kinds of bars.

The first was something I'd made before - key lime pie bars. (Here's the link to when I made them the first time.) The crust on these bars is to die for - and I suppose you could take that literally, since they're probably unhealthy as hell.


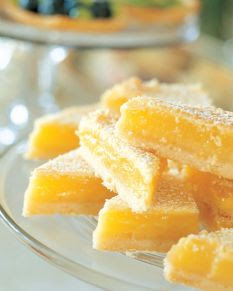
In addition, I made something I'd never made before, but had been wanting to for a long time - Ina Garten's lemon bars. These turned out absolutely delicious! The bottom layer was almost like a sugar cookie. They were sweet but very tangy as well, which is just the way I like my lemon confections. Oftentimes lemon-flavored stuff is way too sweet and it's just too overbearing for my palate. These, however, were absolutely perfect.


Just for the record (and so I don't get sued or something), neither of those pictures are mine. I forgot to take pictures, unfortunately. :(

These citrus bars are a great combo for any get-together. They are both delicious, tangy, and light enough to eat after a big meal. Everyone at our party was raving about them!


KEY LIME PIE BARS
(Adapted from My Baking Addiction)
Yield:  16 bars

CRUST:
  • 1 1/2 cups crushed graham crackers (about 2/3 of a sleeve)
  • 2 tablespoons sugar
  • 1/3 cup butter, melted
  • 1/2 cup sweetened flaked coconut
FILLING:
  • 3 cups sweetened condensed milk
  • 1/2 cup sour cream
  • 3/4 cup key lime juice (I used Nelly and Joes Key Lime Juice)
  • 1 tablespoon grated lime zest
DIRECTIONS:
CRUST: 
  1. In a small bowl, combine the crumbs, coconut and sugar; add butter and blend well. Press onto the bottom of a nine inch springform pan.
  2. Bake at 350 degrees for 8 minutes; cool on wire rack.
FILLING:
  1. Preheat oven to 350 degrees F (175 degrees C).
  2. In a medium bowl, combine condensed milk, sour cream, lime juice, and lime rind. Mix well and pour into graham cracker crust.
  3. Bake in preheated oven for 5 to 8 minutes, until tiny pinhole bubbles burst on the surface of pie. DO NOT BROWN! Chill pie thoroughly before serving. Cut into 16 bars; garnish with powdered sugar.


LEMON BARS
(Adapted from Barefoot Contessa)
Yield:  20 bars

CRUST:
  • 1/2 pound unsalted butter at room temperature
  • 1/2 cup granulated sugar
  • 2 cups all-purpose flour
  • 1/8 teaspoon salt
FILLING:
  • 6 extra-large eggs at room temperature
  • 3 cups granulated sugar
  • 2 tablespoons grated lemon zest (4 to 6 lemons)
  • 1 cup freshly squeezed lemon juice
  • 1 cup all-purpose flour
  • Powdered sugar, for dusting
DIRECTIONS:
  1. Preheat the oven to 350 degrees.
  2. For the crust, cream the butter and sugar until light in the bowl of an electric mixer fitted with the paddle attachment. Combine the flour and salt and, with the mixer on low, add to the butter until just mixed. Dump the dough onto a well-floured board and gather into a ball. Flatten the dough with floured hands and press it into a 9 x 13 x 2-inch baking sheet, building up a 1/2-inch edge on all sides. Chill.
  3. Bake the crust for 15 to 20 minutes, until very lightly browned. Let cool on a wire rack. Leave the oven on.
  4. For the filling, whisk together the eggs, sugar, lemon zest, lemon juice, and flour. Pour over the crust and bake for 30 to 35 minutes, until the filling is set. Let cool to room temperature.
  5. Cut into squares and dust with powdered sugar.

Friday, February 15, 2013

Chocolate-Covered Brownie Hearts


Valentine's Day is over, and it's a good thing, too - I was just about sick of seeing pictures of roses and cards and boxes of candy on Facebook. Does that make me sound like a killjoy? Oh well.

I did contribute one photo to the mania that was Facebook yesterday, and that was of my V-Day present to my family - I made them these heart-shaped chocolate-covered brownies. It's an easy recipe, and it turned out looking so fancy!


I made no changes to the ingredients, but I did add a handful of mini chocolate chips, which added three minutes to my cooking time. Oh, and I forgot to spray my foil-lined pan with non-stick spray but luckily my brownies didn't stick.


Didn't they turn out looking nice? Some of my white chocolate didn't go on smoothly but the chocolate drizzles remedied that.


To serve, I followed Kara's suggestion and put them in pretty pink cupcake liners. Everyone said they looked store-bought!


It  may be too late to use this recipe for Valentine's Day, but it could easily be adapted to fit any holiday, or any day in general! The heart-shaped cutter could easily be switched with a star or even just a plain round cutter. For Christmas shapes, the chocolate drizzle could be red or green.

The brownie recipe is great, especially with chocolate chips added. They tasted better than any brownie mix you'd buy at the store!

Sunday, January 13, 2013

White Chocolate Chip Butterscotch Blondies

Last night my brothers had friends over, so I decided to make these white chocolate chip butterscotch blondies as a snack for everyone. I'm generally not a huge butterscotch fan, but it's my husband's favorite and the recipe did look tasty, so I decided to give it a try.

Since I used self-rising flour I left out the salt and baking powder. My blondies took much longer to bake than the recipe said they would, for some reason - according to the recipe it should have only taken twenty to twenty-five minutes, but mine took thirty-nine. I probably could have left them in even longer, too, but I like my brownies gooey and crumbly, and I didn't want them to burn.

They turned out DELICIOUS. My husband said these were his favorite thing that I've ever made. They were great with a glass of milk. We had to eat them with a fork because they were so crumbly but that may have been because we ate them straight out of the oven, without letting them cool. Who does that, anyway? I don't think I've ever let a baked good cool before eating it.


I highly recommend this recipe to everyone! It's absolutely delicious, and super easy. The guys were all standing around saying these were the best things they'd ever tasted. So, it's good for the ego, too. :)

Tuesday, July 24, 2012

Key Lime Pie Bars

The last few posts have been horribly out of order chronologically, but this marks the point at which things start running the right way along the timeline again. Sorry for any confusion!

So this post's recipe, Key Lime Pie Bars, was made for a Fourth of July party, that was in fact held on the third. The recipe comes from a blog called My Baking Addiction, another blog I recently discovered and fell in love with.

Let me begin by telling you this recipe turned out BEAUTIFULLY. My favorite part of it was the crust, which was awesomely simple but some of the best I've ever had. Only four ingredients in the crust:  graham crackers, sugar, butter, and - surprise - coconut. I usually hate coconut, but this crust made me realize I'd better rethink that.

Now, the recipe calls for key lime juice, three fourths of a cup. It recommends using pre-squeezed juice, but I couldn't find any, so I bought a bag of key limes instead. I asked my mother how many I would need. She said probably three or four. So when I bought the bag of key limes, and it contained about twenty, I thought, "Damn - what the hell am I going to do with all these limes?!" Ha.

It took every last lime to reach that three-fourths line on my measuring cup. I had also used a few of them for the key lime zest, and this is when I realized that I had forgotten to buy a new grater since I loathe the one we have.

The recipe says the bars should be in the oven only 5 to 8 minutes, but mine were in there quite a bit longer and turned out fine. I was waiting for the pinhole bubbles and it took much longer than 8  minutes for them to appear.

The key lime zest did not throw off the smoothness of the bars at all, as I suspected it might. The tart key lime bar perfectly balanced out the sweet graham cracker and coconut crust. Instead of garnishing mine with coconut, I topped some with strawberry halves, others with blueberries, and each one got a dollop of Cool Whip.

I made a pretty little sign for the party.

I can't stop drooling over that crust.


Festive, aren't they? They were a hit. :)

Friday, January 27, 2012

Cheesecake Brownies

In my quest to become the next Great Baker, I have seen many products that seem like just the thing to make it happen. One of these products is the wonderful Cake Pops pan, which I had seen on TV and begged everyone to get me for Christmas. Luckily, my mother-in-law actually listens to me. Lo and behold, as I ripped away the wrapping paper, there it was - my very own cake pops pan.

I was very anxious to use my pan for the first time, so instead of going out and buying cake mix, I used what I already had, which was brownie mix.
Brownie pops, to be precise.

I originally wanted them to be drizzled with melted Ghirardelli white chocolate chips, but alas....I am but a young baker. I cannot seem to figure out how to successfully melt chocolate in a double boiler. If anyone has any advice for me, please share. I ended up sprinkling my pops with confectioner's sugar, and they were a hit nonetheless. I hate failing, though. Damn you, white chocolate!! I don't mean that...

At any rate, my brownie pops are not the star of today's blog. Today, I am describing to you my endeavor to create the combination of two wonderful things into one super-wonderful thing. Cheesecake + brownies = Cheesecake Brownies! Recipe courtesy of the Food Network.

A little rough around the edges, but delicious all the same.

While the recipe calls for making your own brownies from scratch, I went ahead and took a shortcut and used a brownie mix. Lazy, yes, but I was in a hurry and I've made brownies from scratch before, so making them again just to prove to you that I can do it doesn't interest me. Sorry. :P I used their recipe for the cheesecake topping, though. I used Kroger brand brownie mix, and put a handful of mini chocolate chips in, too. Then I prepared the cheesecake topping. I followed the recipe from there on.

These cheesecake brownies are pretty good, though I think I might put just a little more sugar in the cheesecake topping next time. Some of the reviews say the cheesecake to brownie ratio isn't satisfactory; I disagree. I thought it was perfect. These are good warmed in the microwave for fifteen seconds or straight out of the fridge.

I need to practice my swirling. As you can see in the photo, my swirling skills are....lacking.


CHEESECAKE BROWNIES
(Adapted from Food Network)
Yield:  16 bars
 
CHEESECAKE TOPPING:
  • 8 ounces reduced-fat cream cheese (Neufchatel)
  • 1/3 cup sugar
  • 1/2 teaspoon vanilla extract
  • 1 large egg
BROWNIE LAYER:
  • 2 ounces semisweet chocolate, coarsely chopped
  • 3 tablespoons unsalted butter
  • 2 tablespoons canola oil
  • 1 cup all-purpose flour
  • 1/2 cup unsweetened Dutch-process cocoa powder
  • 1 teaspoon baking powder
  • 1/2 teaspoon fine sea salt
  • Pinch cayenne pepper
  • 3/4 cup packed dark brown sugar
  • 1/4 cup granulated sugar
  • 1/2 cup lowfat buttermilk
  • 2 large egg whites
  • 2 teaspoons vanilla extract
DIRECTIONS:
  1. Position the rack in the lower third of the oven and preheat the oven to 350 degrees F.
  2. Line an 8 by 8-inch baking pan with foil so it hangs over the edges by about 1-inch. Spray with cooking spray.
  3. Cheesecake topping: In a medium bowl and using an electric mixer at medium speed, beat the cream cheese until smooth and creamy, about 1 minute. Beat in the sugar and the vanilla until very smooth, 1 to 2 minutes. Beat in the egg until well blended. Set aside.
  4. Brownie layer: Put the chocolate, butter, and oil in a small microwave-safe bowl and heat at 75 percent power for 30 seconds. Stir and microwave again until melted and smooth, about 30 seconds longer. (Alternatively, put the chocolate, butter, and oil in a small heatproof bowl. Bring a small saucepan filled with 1 inch or so of water to a very slow simmer; set the bowl over, not touching, the water, and stir occasionally, until melted and smooth.)
  5. Combine the flour, cocoa powder, baking powder, salt, and cayenne in a medium bowl.
  6. Combine the brown sugar and granulated sugar in a large bowl. Whisk in the buttermilk, egg whites, and vanilla. Add the chocolate mixture and whisk vigorously until fully incorporated and the batter is thick and glossy. Gradually add the flour mixture and stir just until it disappears.
  7. Reserve 1/2 cup brownie batter and set aside. Scrape the remaining brownie batter into the prepared pan. Pour the cheesecake mixture evenly over top. Drop the reserved brownie batter in large dollops over the topping. Draw the handle of a wooden spoon through the two batters to create a swirled effect.
  8. Bake until the top is just set, 40 to 45 minutes. Let cool completely in the pan on a wire rack. Lift brownies out of the pan by the foil and peel off the foil. Spray a knife with cooking spray and cut into 2-inch squares.