Showing posts with label Fruit. Show all posts

Monday, July 1, 2013

Father's Day - Lemon Bars/Key Lime Pie Bars

I never know what to make for Father's Day because neither my dad nor my husband have much of a sweet tooth. I know, I know - they're inhuman. So for this year's dessert, I decided to go with a recipe I've been eyeballing for a long time. Just as I was about to make it, my mom asked me to make a certain recipe in addition. So I ended up making two different kinds of bars.

The first was something I'd made before - key lime pie bars. (Here's the link to when I made them the first time.) The crust on these bars is to die for - and I suppose you could take that literally, since they're probably unhealthy as hell.


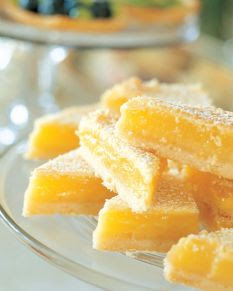
In addition, I made something I'd never made before, but had been wanting to for a long time - Ina Garten's lemon bars. These turned out absolutely delicious! The bottom layer was almost like a sugar cookie. They were sweet but very tangy as well, which is just the way I like my lemon confections. Oftentimes lemon-flavored stuff is way too sweet and it's just too overbearing for my palate. These, however, were absolutely perfect.


Just for the record (and so I don't get sued or something), neither of those pictures are mine. I forgot to take pictures, unfortunately. :(

These citrus bars are a great combo for any get-together. They are both delicious, tangy, and light enough to eat after a big meal. Everyone at our party was raving about them!


KEY LIME PIE BARS
(Adapted from My Baking Addiction)
Yield:  16 bars

CRUST:
  • 1 1/2 cups crushed graham crackers (about 2/3 of a sleeve)
  • 2 tablespoons sugar
  • 1/3 cup butter, melted
  • 1/2 cup sweetened flaked coconut
FILLING:
  • 3 cups sweetened condensed milk
  • 1/2 cup sour cream
  • 3/4 cup key lime juice (I used Nelly and Joes Key Lime Juice)
  • 1 tablespoon grated lime zest
DIRECTIONS:
CRUST: 
  1. In a small bowl, combine the crumbs, coconut and sugar; add butter and blend well. Press onto the bottom of a nine inch springform pan.
  2. Bake at 350 degrees for 8 minutes; cool on wire rack.
FILLING:
  1. Preheat oven to 350 degrees F (175 degrees C).
  2. In a medium bowl, combine condensed milk, sour cream, lime juice, and lime rind. Mix well and pour into graham cracker crust.
  3. Bake in preheated oven for 5 to 8 minutes, until tiny pinhole bubbles burst on the surface of pie. DO NOT BROWN! Chill pie thoroughly before serving. Cut into 16 bars; garnish with powdered sugar.


LEMON BARS
(Adapted from Barefoot Contessa)
Yield:  20 bars

CRUST:
  • 1/2 pound unsalted butter at room temperature
  • 1/2 cup granulated sugar
  • 2 cups all-purpose flour
  • 1/8 teaspoon salt
FILLING:
  • 6 extra-large eggs at room temperature
  • 3 cups granulated sugar
  • 2 tablespoons grated lemon zest (4 to 6 lemons)
  • 1 cup freshly squeezed lemon juice
  • 1 cup all-purpose flour
  • Powdered sugar, for dusting
DIRECTIONS:
  1. Preheat the oven to 350 degrees.
  2. For the crust, cream the butter and sugar until light in the bowl of an electric mixer fitted with the paddle attachment. Combine the flour and salt and, with the mixer on low, add to the butter until just mixed. Dump the dough onto a well-floured board and gather into a ball. Flatten the dough with floured hands and press it into a 9 x 13 x 2-inch baking sheet, building up a 1/2-inch edge on all sides. Chill.
  3. Bake the crust for 15 to 20 minutes, until very lightly browned. Let cool on a wire rack. Leave the oven on.
  4. For the filling, whisk together the eggs, sugar, lemon zest, lemon juice, and flour. Pour over the crust and bake for 30 to 35 minutes, until the filling is set. Let cool to room temperature.
  5. Cut into squares and dust with powdered sugar.

Wednesday, February 13, 2013

Valentine's Day Cake Pops and Strawberries

I'm not Valentine's Day's biggest fan, but I do have to say I love the goodies that come along with it! It's just about the only time of year I like the color pink, too. I'm not very girly at all - I don't think I even own a pink shirt - but when this time of year comes around, who can resist making everything in pretty shades of pink and red?

Maybe it's just the mass amounts of chocolate consumed that make me feel this way, but enough rambling. Let's get this post started. This is one of two Valentine's Day posts I'm going to be posting. This half of the festivity was made for a Valentine's Day party at my father's work. He requested cake pops and chocolate-covered strawberries.


Both of these pictures were taken from a phone, so sorry if they're not top notch. As you can see, half of the cake pops were white and half were pink. Instead of using melted white chocolate this time, I gave vanilla-flavored almond bark a try. I much preferred it to chocolate. The taste is equally delicious and it's thinner (thus, not as heavy), so it was easier to apply. To decorate I used edible pearls and alternate-colored drizzles.

I used a cake mix to make these, so sue me. You may notice that when it comes to things I intend to spend a significant amount of time on decorating, I opt for mixes. Maybe that's lazy, but I'm sorry if I don't want to spend hours upon hours standing in my kitchen while my one-year-old roams the house screaming. I'm 37 weeks pregnant, also - so cut me some slack.


And here are my berries. Again, I used melted almond bark and melted milk chocolate to dip these, with alternate-colored drizzles. I think the white ones with the pink drizzles look pretty cool.

Everyone loved them, my dad said. Who doesn't love fruit dipped in chocolate and bits of cake on a stick?

Yes, so speaking of me being pregnant - about that. Like I said, I'm 37 weeks along so any time now my little girl will be making her arrival into this world. I'll keep baking and blogging until she gets here, but once she's here, it may be a short while before I can establish a new routine and get back in the groove enough to start blogging again! I'm not talking months and months, just a few weeks maybe. I'm giving you fair warning so you don't get tired of waiting and give up on me.

Anyway, so keep an eye out for Valentine's Day post number two, which I'll have up sometime within the next two days. Until next time!

Saturday, January 26, 2013

Rose Cake - Strawberry with Vanilla Buttercream

January 24 is my husband's birthday, and his favorite kind of cake is strawberry. So this year I made him a strawberry cake, per his request, and he graciously allowed me to adorn it with roses for practice.

The recipe I used was recommended to me from one of my mother's coworkers - it comes from Paula Deen. I can't decide whether I can truly call it homemade, since instead of adding flour or sugar it calls for a box mix, but the confusion ends there. It's an easy recipe and the addition of gelatin mix makes for an interesting, almost carbonated-tasting kick. The use of frozen strawberries in syrup makes the cake very moist.

The only variation I made in the recipe was the baking time. My cake didn't look done after only twenty minutes, so I left it in a bit longer. It ended up taking twenty-eight minutes total.

For the frosting, I used this recipe. It worked well for me last time so why fix what isn't broken? I ended up running out before my cake was done being decorated, though, so I had to make another half batch. I used butter instead of shortening for this because I had run out of shortening. The color was slightly yellower but my family couldn't tell until I pointed it out.


This is the first layer cake (or rose cake, for that matter) I've made that I actually got to taste, so here's my opinion of the frosting. While it holds its shape perfectly for a rose cake, the roses cause the frosting to be so thick that it's almost too sweet. With this particular cake recipe, the slight tang of the gelatin mix mingled nicely with the sweetness, but with other recipes the sweetness might have been overwhelming. I think next time I'll use less sugar. With a whole two-pound bag of sugar in it, I suppose it's a "DUH" that the frosting would be that sweet, but oh well.

The final verdict:  With this cake, this frosting would be perfect in lesser amounts. With other cakes, I can't say since I haven't tasted it myself, but I imagine that it would be too sweet if paired with a cake recipe that was also super-sweet. Altogether, my cake went over well and I am happy with it. Still a long way to go on my decorating, but I'm getting better!

Wednesday, January 23, 2013

Chocolate-Dipped Decorated Strawberries

My mom needed me to make something for her work's January get-together and she requested chocolate-dipped strawberries. Simple enough. However, I had just seen a Shari's Berries flyer in the mail, and feeling inspired, I decided to do a little more than just dip them in chocolate.

 
As you can see, I used milk and white chocolate to dip my berries in. For decorations, I used silver sugar crystals and edible pearls. And on some of the milk chocolate berries, I drizzled them with white chocolate. I left a few of both plain, just for accent. 

 
My favorites turned out to be the drizzled berries. Maybe that's just because they look so damn fancy.

Friday, January 11, 2013

Mini Apple Pies

My mom makes this awesome pastry braid thing for New Year's Day dinner. It's corned beef, cabbage, and Swiss cheese all wrapped up and it's DELICIOUS. This year, she decided to experiment with Pillsbury Crescent Roll Seamless Dough Sheets. She bought two and only used one, so we had one left over.

The point of telling you this is, this leftover pastry dough was the reason I made these mini pies. I was looking for something to make with it and these are what I decided on.

For my filling, I used Pillsbury's Perfect Apple Pie recipe. I changed it up a little bit to suit my tastes - I only used one tablespoon of flour, half a teaspoon of lemon juice, and about one sixteenth of nutmeg (I'm not a huge nutmeg fan). Also, my apples were a little smaller than medium-sized, and they were Granny Smith.

For my baking directions, I followed Dollhouse Bake Shoppe's cues. I baked them at 375 degrees and planned on following her advice to bake for 25 to 30 minutes, but they only took ten. Granted, I only made six mini pies. This is because after six I didn't feel like making anymore. I had loads of filling left over, as you might imagine. With it I plan to make applesauce. If it works out, maybe I'll post that on here too. Who knows.

I'd intended to drop a bit of butter on top of the filling in each pie before adding the lattice, but I forgot. I also forgot to add the egg wash which gives pies such a pretty sheen. At any rate, they turned out lovely enough.


Wednesday, December 12, 2012

Banana Nut Muffins

This will be a short post - I just want to share the simple recipe I found for banana nut muffins. I don't have a picture because A, this recipe is so simple and I didn't really feel a picture was required - don't all muffins look more or less the same? - and B, they were all eaten VERY quickly. So instead of a picture of my own, I'm using one from the recipe's website.

The only variation I made ingredients-wise was instead of only adding a fourth cup of mashed banana, I added two whole mashed bananas. They were sitting around and were about to go bad so my mom asked me to use them for something, so here we are. The other change I made to this recipe was I made mini muffins instead of regular sized ones. It yielded twenty-two minis.

Because of the pan change, I had to adjust the cooking time. I cooked them in two batches since I only have one mini muffin pan. Each batch took approximately 13 minutes.

As I said, the first twelve were gone before I even put the second batch in the oven. The second batch lasted a little longer, but not by much. This is a delicious recipe and VERY simple, and it tastes exactly like a box mix - but better, of course, because it's homemade.

Friday, November 9, 2012

Cheesecake-Stuffed, Chocolate-Dipped Strawberries

Do you know what the number one repinned recipe on Pinterest is? Before I tell you the answer, let me make one thing clear. Do NOT discount the opinions of 700,000 Pinners (plus one more - me!). If that number tells you anything, it should be that THESE ARE GOOD.

The recipe in question is Cheesecake-Stuffed Strawberries from The Sweets Life. I added the chocolate-dipped part myself. I mean, chocolate can ONLY make things better. Except for onions. I imagine chocolate-dipped onions are pretty atrocious.

In the prelude before the recipe, she states that she made hers twenty-four hours ahead and they turned out fine. Since I was making mine for a joint party for my parents (both their birthdays are in November) and I was going to be busy before the party, I decided to do so as well.

I only used three tablespoons of powdered sugar, since I was planning on dipping the berries in chocolate and I didn't want them to be too sweet. Without the chocolate, I'd probably add more, but the way I made them turned out perfect.

I used Dolci Frutta melting chocolate to dip my berries in.


They were a hit at the party. Only two were left afterwards, and this morning when I looked in the fridge they were gone. My dad's already asked me to make a bigger batch of them for his work function next week.

My only complaint is the berries were not as firm as they were when I prepared them the night before. I suppose this is to be expected. I don't think I'll make them twenty-four hours ahead next time - maybe just a few hours ahead, so that they'll maintain their firmness better.

This recipe gets an absolute, hands-down A+++ in my book!

Wednesday, October 10, 2012

Cherry Danish Pastries

My grandpa's birthday is today, and about a week ago he mentioned that his favorite baked goods are Danish pastries. After talking to my mom I learned he digs cherry stuff too, so for his birthday I have made him cherry Danishes, according to this recipe from allrecipes.com.

First of all, when I read through this recipe for the first time, before I'd gathered my ingredients or anything, I knew this recipe might be beyond my skill level. That's probably not being modest enough, honestly. Still, I like to give myself credit, and I figured I wouldn't tell my grandpa I was making these so that if they turned out horribly and I had to throw them away, he wouldn't be disappointed.

It's not a necessarily difficult recipe to follow - the instructions are clear, and it's fairly simple in regards to ingredients - but it is labor-intensive, and a bit of haste is required when dealing with the butter/flour mixture...but we'll get to that.

So I started out by adjusting the recipe to make 12 servings, rather than 36. My grandpa has multiple health issues and, though I'm sure he'd love to receive 36 Danishes, I know I'd feel bad if he had a heart attack or something because of it. However, the adjustment was only made to the ingredients. The recipe remained for the original serving size of 36. In most recipes this wouldn't be an issue but this recipe calls for certain amounts of ingredients at different times, so I had to do a little math (which has never been my strong suit).

So here's what I came to. In step 1, it says to cream together the butter and 2/3 cup of flour. For my 12 servings batch, however, I creamed together the butter and 3 tablespoons plus 1 3/4 teaspoons flour. Figuring that out was relatively easy.

In step 2, it says to mix the dry yeast and 3 cups of the remaining flour. After doing some math, I figured out that I needed to mix 1 cup of my remaining flour to the dry yeast. That left me with 1 2/3 cups of flour for the rest of the recipe.

After kneading my dough, it became firm and pliable with about 1/4 to 1/3 of a cup of flour still left over. Not wanting to make my dough too tough, I discarded it and left my dough to rise.

Upon pulling the cold butter sheets out of the fridge to fold into my dough, I found myself having to scrape the butter off of the wax paper rather than it coming off in the nice, simple sheet it was supposed to be. Still, this wasn't a big deal as I just spread the butter mixture around with a knife. To me there seemed to be a LOT of butter - when I pressed the edges to seal in the butter and rolled over it with my pin, butter oozed out the edges. I tried as well as I could to keep it contained but there was just so much, I had to let some of it go. The butter coated the cutting board I was using as a surface and got all over my rolling pin, a problem I somewhat remedied by placing a sheet of wax paper between the dough and my pin.

The butter seemed to be absorbed by the dough during its thirty-minutes stints in the refrigerator, at least some of it was. It was still pretty buttery when I got it out to place the filling. For filling I used Smucker's Cherry Preserves. It took me a minute to figure out how much to put without putting too much or too little. Then I folded over two corners to make it pretty. And for a final touch, I brushed them with egg whites for a nice shine.

How they looked before they went into the oven.

Beautiful, right? Wrong. The heat of the oven must have made the butter too slippery or something, because when I pulled them out of the oven (after 8 minutes), they looked like this.

How they looked when they came out. Blurghh.

I was about to damn the whole project but my mother, always an optimist, convinced me to press on. In the end I'm glad I did, but at the time I was rather depressed.

I added a bit more preserves to each one, hoping to save at least a few of the least-crappy looking ones for my grandpa's birthday. But then I remembered the icing.

This recipe, which I found simply by typing "danish pastry icing" into Google, made perfect icing. To apply it to the pastries, I cut the tip off a gallon baggy and drizzled it back and forth across each one. For such a simple recipe, this icing is tasty - and totally saved my Danishes!

See for yourself.

I was so happy. They still didn't turn out the way I expected them to look, but I'm not complaining - at least they turned out somewhat pretty.

Not too bad, after all.

As for the taste, we took one of the ugly ones and split it amongst ourselves. I thought the pastry was bland, especially for all the effort I'd put into it. It wasn't very flaky either, although that could very well be directly linked to my skill level. Oh, and something else - the recipe specifically said NOT to grease the pan, so I didn't - but the bottom of a few of the pastries stuck to the pan.

We'll see how my grandpa likes them. I'll update this once I have his expert opinion.

Tuesday, July 24, 2012

Key Lime Pie Bars

The last few posts have been horribly out of order chronologically, but this marks the point at which things start running the right way along the timeline again. Sorry for any confusion!

So this post's recipe, Key Lime Pie Bars, was made for a Fourth of July party, that was in fact held on the third. The recipe comes from a blog called My Baking Addiction, another blog I recently discovered and fell in love with.

Let me begin by telling you this recipe turned out BEAUTIFULLY. My favorite part of it was the crust, which was awesomely simple but some of the best I've ever had. Only four ingredients in the crust:  graham crackers, sugar, butter, and - surprise - coconut. I usually hate coconut, but this crust made me realize I'd better rethink that.

Now, the recipe calls for key lime juice, three fourths of a cup. It recommends using pre-squeezed juice, but I couldn't find any, so I bought a bag of key limes instead. I asked my mother how many I would need. She said probably three or four. So when I bought the bag of key limes, and it contained about twenty, I thought, "Damn - what the hell am I going to do with all these limes?!" Ha.

It took every last lime to reach that three-fourths line on my measuring cup. I had also used a few of them for the key lime zest, and this is when I realized that I had forgotten to buy a new grater since I loathe the one we have.

The recipe says the bars should be in the oven only 5 to 8 minutes, but mine were in there quite a bit longer and turned out fine. I was waiting for the pinhole bubbles and it took much longer than 8  minutes for them to appear.

The key lime zest did not throw off the smoothness of the bars at all, as I suspected it might. The tart key lime bar perfectly balanced out the sweet graham cracker and coconut crust. Instead of garnishing mine with coconut, I topped some with strawberry halves, others with blueberries, and each one got a dollop of Cool Whip.

I made a pretty little sign for the party.

I can't stop drooling over that crust.


Festive, aren't they? They were a hit. :)

Mini Cheesecakes Topped with Fruit

Since the last couple of posts and the next few are me playing catch-up, I'm kind of falling out of chronological order. Example:  Last post was what I made for Father's Day, and this post is going to be about what I made for Mother's Day. I know, I fail.

For Mother's Day, I made mini-cheesecakes with chocolate crust, topped with fruit. I had a lot of batter left over, though, so I also made a regular cheesecake. That one had a pre-made graham cracker crust and was glazed with chocolate, then topped with fruit. The recipe I used for the cheesecake is the one on the side of Philadelphia cream cheese, which I can't find the recipe for online to provide a link, but if I do in the future, I'll definitely post it.

My last experience with cheesecake bore the same results as this one. My cheesecake cracked on top. I know that means it's been overcooked. I'll just have to stare through the oven window the last few minutes, I suppose.

That damn crack.


My mini cheesecakes also cracked. UGH. At least the crack in the big one could be hidden by chocolate.


My awesome mini cheesecake pan.

A close-up of the crackage.

After cooling, I glazed the large cheesecake with Duncan Hines' Amazing Glaze. If you click on the link and look at the picture, I can promise you that is NOT what it looked like. It did not flow out; it did not harden into a lovely, smooth surface. No, it had to be smoothed manually with a spatula. But that could have been forgiven, if the glaze tasted amazing. It didn't. It tasted more like sugar than chocolate. I regretted using it. My last visit to the grocery store, while perusing the baking supplies aisle, I saw that Kroger had it on clearance. No wonder.

Again, I apologize for the unsightly yellow hue. I have no idea why my camera does that.

Still, the large cheesecake ended up looking nice.

My mini cheesecakes turned out perfect - other than the cracked tops, of course. They did not taste overcooked at all, let me assure you. Their chocolate crust was a nice accompaniment to the tart fruit they were topped with.

The ones in the back topped with just chocolate were for my grandmother, who's allergic to anything with seeds.


This recipe is definitely a make-again. If you are unable to find the Philadelphia recipe for original cheesecake, any similar recipe will do.

Lemon Cake

It's been a while since I've had time to post anything new - my son recently learned to crawl and I've been chasing him constantly. But he's asleep now (THANK GOD) so I'm going to try to catch up tonight.

I've baked quite a few things since I last wrote. We'll start with the oldest, and go from there.

This first post is going to be Lemon Cake. I made it in two loaf pans, so we kept one and sent the other to his boss. The blog from which I pulled this recipe from is one I discovered recently and promptly fell in love with. Go pay her a visit at the Smitten Kitchen. The recipe is adapted from one by Ina Garten, whom I had never heard of before this instance, but I can say with assurance that woman definitely knows what's up. I am not generally a fan of lemon anything, but this cake was AWESOME.

The recipe gives the options of baking two loaves or one bundt, and as I mentioned previously, I chose the former. The plan was to decorate my husband's boss's cake with sliced lemons, to make it pretty. Except I forgot to do that. Next time...

I squeezed all my lemon juice myself and grated the peels with a horrible grater that I have. I made a mental note to buy a new one, but I forgot and was reminded when I made key lime pie bars for a Fourth of July party - that recipe will be up soon. :)

I did not have parchment paper, so I merely sprayed the bottom of the loaf pan generously with PAM. I should also mention that I do not have two loaf pans, so I split the batter in two and used the same pan twice.

Sifting together the dry ingredients took time, but it was definitely worth it. The cake turned out very light and fluffy.

Now, after the cake comes out, the recipe instructs you to wait ten minutes before pouring on the lemon syrup. However, I had the foresight to read the blog's comments, and several of them suggested pouring it on immediately, which I did. It soaked up the syrup very nicely and left no soggy areas. After letting it cool, I then poured on the glaze.

So lovely.


The glaze was an excellent complement to the cake. The cake was sweet, while the glaze brought in the tart lemony flavor often left desired in citrus desserts. And as I said earlier, the cake itself was light, so you could eat more than one piece and not feel like a fat pile of lard. I mean, if you wanted to. I wouldn't know anything about that. ;)


Smitten kitchen, indeed.

Saturday, January 28, 2012

Banana Pudding

I am up at six in the morning, not because I am one of those horrible perky morning-people that everyone loves to hate, but because soon I am going to be on my way to an Open House at the Louisville campus of Sullivan University. In case you don't know, Sullivan has one of the best culinary programs in the country. Getting my degree in baking and pastry arts at Sullivan would be amazing, but it's so damn expensive. Oh well - here's hoping!

Today's endeavor is Banana Pudding, courtesy of allrecipes.com. It was my husband's birthday, and this is his favorite, so being the great wife that I am, I made this for him.

Beautiful, yes?

Instead of a small rectangular dish, like the one shown in the photo on the recipe's page, I chose to prepare mine in a punchbowl. Unfortunately, I was not aware that it would not fill the punchbowl to the top, so it appears slightly underwhelming. In the future, I will have to make a larger quantity, or use a different dish to serve it in.

The recipe calls for a can of sweetened condensed milk and three cups of cold milk. I did not follow these instructions. You see, on the side of the box of instant vanilla pudding mix that the recipe also calls for, I happened to find another recipe for banana pudding, similar, but not quite the same. Jello's recipe for banana pudding calls for two and a half cups of cold milk, but no sweetened condensed milk. So what I did was add two and a half cups of milk, but some of that was condensed and some was cold. I used a can of condensed and made up the difference with cold milk to total two and a half cups. Does that make sense? I tried to explain it clearly, did I only succeed in bogging it up?

Also, I did not reserve half of the Cool Whip to spread on top. I just mixed the whole container into the pudding. I put a layer of Nilla Wafers on the bottom of the punchbowl, then a layer of banana slices, then a layer of pudding. Then I did repeated. I sprinkled the top with crushed Nilla Wafers to give it that "elegant" look.

Nice.

My husband loved it. He said the texture was more whipped than most banana puddings he'd had. He said usually they are sort of runny. But that would be because I put the whole damn container in there. He wasn't complaining though. Cool Whip makes everything better.

While simple to make, I consider this a definite Success to mark off my list. Oh yes, I have a List of 100 Things Every Baker Must Make Before They Die. I got this idea from Brown Eyed Baker. She's brilliant.

See? I give credit where credit's due. I don't want to get in trouble.

Anyway, I think I'm going to post My 100 List for everyone to see, though I must warn you it's only at 98 currently. Taking requests! ;)